mirror of
https://github.com/fastapi/fastapi.git
synced 2026-06-09 08:04:46 -04:00
Compare commits
1 Commits
check-zh-t
...
dependabot
| Author | SHA1 | Date | |
|---|---|---|---|
|
|
50db62f213 |
6
.github/workflows/build-docs.yml
vendored
6
.github/workflows/build-docs.yml
vendored
@@ -21,7 +21,7 @@ jobs:
|
||||
outputs:
|
||||
docs: ${{ steps.filter.outputs.docs }}
|
||||
steps:
|
||||
- uses: actions/checkout@de0fac2e4500dabe0009e67214ff5f5447ce83dd # v6.0.2
|
||||
- uses: actions/checkout@df4cb1c069e1874edd31b4311f1884172cec0e10 # v6.0.3
|
||||
with:
|
||||
persist-credentials: false
|
||||
# For pull requests it's not necessary to checkout the code but for the main branch it is
|
||||
@@ -47,7 +47,7 @@ jobs:
|
||||
outputs:
|
||||
langs: ${{ steps.show-langs.outputs.langs }}
|
||||
steps:
|
||||
- uses: actions/checkout@de0fac2e4500dabe0009e67214ff5f5447ce83dd # v6.0.2
|
||||
- uses: actions/checkout@df4cb1c069e1874edd31b4311f1884172cec0e10 # v6.0.3
|
||||
with:
|
||||
persist-credentials: false
|
||||
- name: Set up Python
|
||||
@@ -86,7 +86,7 @@ jobs:
|
||||
env:
|
||||
GITHUB_CONTEXT: ${{ toJson(github) }}
|
||||
run: echo "$GITHUB_CONTEXT"
|
||||
- uses: actions/checkout@de0fac2e4500dabe0009e67214ff5f5447ce83dd # v6.0.2
|
||||
- uses: actions/checkout@df4cb1c069e1874edd31b4311f1884172cec0e10 # v6.0.3
|
||||
with:
|
||||
persist-credentials: false
|
||||
- name: Set up Python
|
||||
|
||||
4
.github/workflows/contributors.yml
vendored
4
.github/workflows/contributors.yml
vendored
@@ -23,7 +23,7 @@ jobs:
|
||||
env:
|
||||
GITHUB_CONTEXT: ${{ toJson(github) }}
|
||||
run: echo "$GITHUB_CONTEXT"
|
||||
- uses: actions/checkout@de0fac2e4500dabe0009e67214ff5f5447ce83dd # v6.0.2
|
||||
- uses: actions/checkout@df4cb1c069e1874edd31b4311f1884172cec0e10 # v6.0.3
|
||||
with:
|
||||
persist-credentials: true # Required for `git push` in `contributors.py`
|
||||
- name: Set up Python
|
||||
@@ -44,7 +44,7 @@ jobs:
|
||||
run: uv sync --locked --no-dev --group github-actions
|
||||
# Allow debugging with tmate
|
||||
- name: Setup tmate session
|
||||
uses: mxschmitt/action-tmate@c0afd6f790e3a5564914980036ebf83216678101 # v3.23
|
||||
uses: mxschmitt/action-tmate@35b54afac29c97fb54faba5b513f8fbd1882f113 # v3.24
|
||||
if: ${{ github.event_name == 'workflow_dispatch' && github.event.inputs.debug_enabled == 'true' }}
|
||||
with:
|
||||
limit-access-to-actor: true
|
||||
|
||||
2
.github/workflows/create-draft-release.yml
vendored
2
.github/workflows/create-draft-release.yml
vendored
@@ -22,7 +22,7 @@ jobs:
|
||||
env:
|
||||
GITHUB_CONTEXT: ${{ toJson(github) }}
|
||||
run: echo "$GITHUB_CONTEXT"
|
||||
- uses: actions/checkout@de0fac2e4500dabe0009e67214ff5f5447ce83dd # v6.0.2
|
||||
- uses: actions/checkout@df4cb1c069e1874edd31b4311f1884172cec0e10 # v6.0.3
|
||||
with:
|
||||
ref: ${{ github.event.repository.default_branch }}
|
||||
persist-credentials: true
|
||||
|
||||
2
.github/workflows/deploy-docs.yml
vendored
2
.github/workflows/deploy-docs.yml
vendored
@@ -22,7 +22,7 @@ jobs:
|
||||
env:
|
||||
GITHUB_CONTEXT: ${{ toJson(github) }}
|
||||
run: echo "$GITHUB_CONTEXT"
|
||||
- uses: actions/checkout@de0fac2e4500dabe0009e67214ff5f5447ce83dd # v6.0.2
|
||||
- uses: actions/checkout@df4cb1c069e1874edd31b4311f1884172cec0e10 # v6.0.3
|
||||
with:
|
||||
persist-credentials: false
|
||||
- name: Set up Python
|
||||
|
||||
2
.github/workflows/label-approved.yml
vendored
2
.github/workflows/label-approved.yml
vendored
@@ -19,7 +19,7 @@ jobs:
|
||||
env:
|
||||
GITHUB_CONTEXT: ${{ toJson(github) }}
|
||||
run: echo "$GITHUB_CONTEXT"
|
||||
- uses: actions/checkout@de0fac2e4500dabe0009e67214ff5f5447ce83dd # v6.0.2
|
||||
- uses: actions/checkout@df4cb1c069e1874edd31b4311f1884172cec0e10 # v6.0.3
|
||||
with:
|
||||
persist-credentials: false
|
||||
- name: Set up Python
|
||||
|
||||
4
.github/workflows/latest-changes.yml
vendored
4
.github/workflows/latest-changes.yml
vendored
@@ -28,14 +28,14 @@ jobs:
|
||||
env:
|
||||
GITHUB_CONTEXT: ${{ toJson(github) }}
|
||||
run: echo "$GITHUB_CONTEXT"
|
||||
- uses: actions/checkout@de0fac2e4500dabe0009e67214ff5f5447ce83dd # v6.0.2
|
||||
- uses: actions/checkout@df4cb1c069e1874edd31b4311f1884172cec0e10 # v6.0.3
|
||||
with:
|
||||
# To allow latest-changes to commit to the main branch
|
||||
token: ${{ secrets.FASTAPI_LATEST_CHANGES }} # zizmor: ignore[secrets-outside-env]
|
||||
persist-credentials: true # required by tiangolo/latest-changes
|
||||
# Allow debugging with tmate
|
||||
- name: Setup tmate session
|
||||
uses: mxschmitt/action-tmate@c0afd6f790e3a5564914980036ebf83216678101 # v3.23
|
||||
uses: mxschmitt/action-tmate@35b54afac29c97fb54faba5b513f8fbd1882f113 # v3.24
|
||||
if: ${{ github.event_name == 'workflow_dispatch' && github.event.inputs.debug_enabled == 'true' }}
|
||||
with:
|
||||
limit-access-to-actor: true
|
||||
|
||||
4
.github/workflows/notify-translations.yml
vendored
4
.github/workflows/notify-translations.yml
vendored
@@ -30,7 +30,7 @@ jobs:
|
||||
env:
|
||||
GITHUB_CONTEXT: ${{ toJson(github) }}
|
||||
run: echo "$GITHUB_CONTEXT"
|
||||
- uses: actions/checkout@de0fac2e4500dabe0009e67214ff5f5447ce83dd # v6.0.2
|
||||
- uses: actions/checkout@df4cb1c069e1874edd31b4311f1884172cec0e10 # v6.0.3
|
||||
with:
|
||||
persist-credentials: false
|
||||
- name: Set up Python
|
||||
@@ -51,7 +51,7 @@ jobs:
|
||||
run: uv sync --locked --no-dev --group github-actions
|
||||
# Allow debugging with tmate
|
||||
- name: Setup tmate session
|
||||
uses: mxschmitt/action-tmate@c0afd6f790e3a5564914980036ebf83216678101 # v3.23
|
||||
uses: mxschmitt/action-tmate@35b54afac29c97fb54faba5b513f8fbd1882f113 # v3.24
|
||||
if: ${{ github.event_name == 'workflow_dispatch' && github.event.inputs.debug_enabled == 'true' }}
|
||||
with:
|
||||
limit-access-to-actor: true
|
||||
|
||||
4
.github/workflows/people.yml
vendored
4
.github/workflows/people.yml
vendored
@@ -23,7 +23,7 @@ jobs:
|
||||
env:
|
||||
GITHUB_CONTEXT: ${{ toJson(github) }}
|
||||
run: echo "$GITHUB_CONTEXT"
|
||||
- uses: actions/checkout@de0fac2e4500dabe0009e67214ff5f5447ce83dd # v6.0.2
|
||||
- uses: actions/checkout@df4cb1c069e1874edd31b4311f1884172cec0e10 # v6.0.3
|
||||
with:
|
||||
persist-credentials: true # Required for `git push` in `people.py`
|
||||
- name: Set up Python
|
||||
@@ -44,7 +44,7 @@ jobs:
|
||||
run: uv sync --locked --no-dev --group github-actions
|
||||
# Allow debugging with tmate
|
||||
- name: Setup tmate session
|
||||
uses: mxschmitt/action-tmate@c0afd6f790e3a5564914980036ebf83216678101 # v3.23
|
||||
uses: mxschmitt/action-tmate@35b54afac29c97fb54faba5b513f8fbd1882f113 # v3.24
|
||||
if: ${{ github.event_name == 'workflow_dispatch' && github.event.inputs.debug_enabled == 'true' }}
|
||||
with:
|
||||
limit-access-to-actor: true
|
||||
|
||||
4
.github/workflows/pre-commit.yml
vendored
4
.github/workflows/pre-commit.yml
vendored
@@ -21,7 +21,7 @@ jobs:
|
||||
env:
|
||||
GITHUB_CONTEXT: ${{ toJson(github) }}
|
||||
run: echo "$GITHUB_CONTEXT"
|
||||
- uses: actions/checkout@de0fac2e4500dabe0009e67214ff5f5447ce83dd # v6.0.2
|
||||
- uses: actions/checkout@df4cb1c069e1874edd31b4311f1884172cec0e10 # v6.0.3
|
||||
name: Checkout PR for own repo
|
||||
if: env.HAS_SECRETS == 'true'
|
||||
with:
|
||||
@@ -34,7 +34,7 @@ jobs:
|
||||
token: ${{ secrets.PRE_COMMIT }} # zizmor: ignore[secrets-outside-env]
|
||||
persist-credentials: true # Required for `git push` command
|
||||
# pre-commit lite ci needs the default checkout configs to work
|
||||
- uses: actions/checkout@de0fac2e4500dabe0009e67214ff5f5447ce83dd # v6.0.2
|
||||
- uses: actions/checkout@df4cb1c069e1874edd31b4311f1884172cec0e10 # v6.0.3
|
||||
name: Checkout PR for fork
|
||||
if: env.HAS_SECRETS == 'false'
|
||||
with:
|
||||
|
||||
2
.github/workflows/prepare-release.yml
vendored
2
.github/workflows/prepare-release.yml
vendored
@@ -34,7 +34,7 @@ jobs:
|
||||
env:
|
||||
GITHUB_CONTEXT: ${{ toJson(github) }}
|
||||
run: echo "$GITHUB_CONTEXT"
|
||||
- uses: actions/checkout@de0fac2e4500dabe0009e67214ff5f5447ce83dd # v6.0.2
|
||||
- uses: actions/checkout@df4cb1c069e1874edd31b4311f1884172cec0e10 # v6.0.3
|
||||
with:
|
||||
token: ${{ secrets.FASTAPI_LATEST_CHANGES }} # zizmor: ignore[secrets-outside-env]
|
||||
persist-credentials: true
|
||||
|
||||
2
.github/workflows/publish.yml
vendored
2
.github/workflows/publish.yml
vendored
@@ -19,7 +19,7 @@ jobs:
|
||||
env:
|
||||
GITHUB_CONTEXT: ${{ toJson(github) }}
|
||||
run: echo "$GITHUB_CONTEXT"
|
||||
- uses: actions/checkout@de0fac2e4500dabe0009e67214ff5f5447ce83dd # v6.0.2
|
||||
- uses: actions/checkout@df4cb1c069e1874edd31b4311f1884172cec0e10 # v6.0.3
|
||||
with:
|
||||
persist-credentials: false
|
||||
- name: Set up Python
|
||||
|
||||
2
.github/workflows/smokeshow.yml
vendored
2
.github/workflows/smokeshow.yml
vendored
@@ -19,7 +19,7 @@ jobs:
|
||||
env:
|
||||
GITHUB_CONTEXT: ${{ toJson(github) }}
|
||||
run: echo "$GITHUB_CONTEXT"
|
||||
- uses: actions/checkout@de0fac2e4500dabe0009e67214ff5f5447ce83dd # v6.0.2
|
||||
- uses: actions/checkout@df4cb1c069e1874edd31b4311f1884172cec0e10 # v6.0.3
|
||||
with:
|
||||
persist-credentials: false
|
||||
- uses: actions/setup-python@a309ff8b426b58ec0e2a45f0f869d46889d02405 # v6.2.0
|
||||
|
||||
4
.github/workflows/sponsors.yml
vendored
4
.github/workflows/sponsors.yml
vendored
@@ -24,7 +24,7 @@ jobs:
|
||||
env:
|
||||
GITHUB_CONTEXT: ${{ toJson(github) }}
|
||||
run: echo "$GITHUB_CONTEXT"
|
||||
- uses: actions/checkout@de0fac2e4500dabe0009e67214ff5f5447ce83dd # v6.0.2
|
||||
- uses: actions/checkout@df4cb1c069e1874edd31b4311f1884172cec0e10 # v6.0.3
|
||||
with:
|
||||
persist-credentials: true # Required for `git push` in `sponsors.py`
|
||||
- name: Set up Python
|
||||
@@ -45,7 +45,7 @@ jobs:
|
||||
run: uv sync --locked --no-dev --group github-actions
|
||||
# Allow debugging with tmate
|
||||
- name: Setup tmate session
|
||||
uses: mxschmitt/action-tmate@c0afd6f790e3a5564914980036ebf83216678101 # v3.23
|
||||
uses: mxschmitt/action-tmate@35b54afac29c97fb54faba5b513f8fbd1882f113 # v3.24
|
||||
if: ${{ github.event_name == 'workflow_dispatch' && github.event.inputs.debug_enabled == 'true' }}
|
||||
with:
|
||||
limit-access-to-actor: true
|
||||
|
||||
2
.github/workflows/test-redistribute.yml
vendored
2
.github/workflows/test-redistribute.yml
vendored
@@ -20,7 +20,7 @@ jobs:
|
||||
env:
|
||||
GITHUB_CONTEXT: ${{ toJson(github) }}
|
||||
run: echo "$GITHUB_CONTEXT"
|
||||
- uses: actions/checkout@de0fac2e4500dabe0009e67214ff5f5447ce83dd # v6.0.2
|
||||
- uses: actions/checkout@df4cb1c069e1874edd31b4311f1884172cec0e10 # v6.0.3
|
||||
with:
|
||||
persist-credentials: false
|
||||
- name: Set up Python
|
||||
|
||||
10
.github/workflows/test.yml
vendored
10
.github/workflows/test.yml
vendored
@@ -29,7 +29,7 @@ jobs:
|
||||
outputs:
|
||||
src: ${{ steps.filter.outputs.src }}
|
||||
steps:
|
||||
- uses: actions/checkout@de0fac2e4500dabe0009e67214ff5f5447ce83dd # v6.0.2
|
||||
- uses: actions/checkout@df4cb1c069e1874edd31b4311f1884172cec0e10 # v6.0.3
|
||||
with:
|
||||
persist-credentials: false
|
||||
# For pull requests it's not necessary to checkout the code but for the main branch it is
|
||||
@@ -110,7 +110,7 @@ jobs:
|
||||
env:
|
||||
GITHUB_CONTEXT: ${{ toJson(github) }}
|
||||
run: echo "$GITHUB_CONTEXT"
|
||||
- uses: actions/checkout@de0fac2e4500dabe0009e67214ff5f5447ce83dd # v6.0.2
|
||||
- uses: actions/checkout@df4cb1c069e1874edd31b4311f1884172cec0e10 # v6.0.3
|
||||
with:
|
||||
persist-credentials: false
|
||||
- name: Set up Python
|
||||
@@ -174,7 +174,7 @@ jobs:
|
||||
env:
|
||||
GITHUB_CONTEXT: ${{ toJson(github) }}
|
||||
run: echo "$GITHUB_CONTEXT"
|
||||
- uses: actions/checkout@de0fac2e4500dabe0009e67214ff5f5447ce83dd # v6.0.2
|
||||
- uses: actions/checkout@df4cb1c069e1874edd31b4311f1884172cec0e10 # v6.0.3
|
||||
with:
|
||||
persist-credentials: false
|
||||
- name: Set up Python
|
||||
@@ -194,7 +194,7 @@ jobs:
|
||||
- name: Install Dependencies
|
||||
run: uv sync --no-dev --group tests --extra all
|
||||
- name: CodSpeed benchmarks
|
||||
uses: CodSpeedHQ/action@3194d9a39c4d46684cb44bf7207fc56626aad8fd # v4.15.1
|
||||
uses: CodSpeedHQ/action@9d332c4d90b43981c3e55ae8e38e68709996240f # v4.17.0
|
||||
with:
|
||||
mode: simulation
|
||||
run: uv run --no-sync pytest tests/benchmarks --codspeed
|
||||
@@ -209,7 +209,7 @@ jobs:
|
||||
env:
|
||||
GITHUB_CONTEXT: ${{ toJson(github) }}
|
||||
run: echo "$GITHUB_CONTEXT"
|
||||
- uses: actions/checkout@de0fac2e4500dabe0009e67214ff5f5447ce83dd # v6.0.2
|
||||
- uses: actions/checkout@df4cb1c069e1874edd31b4311f1884172cec0e10 # v6.0.3
|
||||
with:
|
||||
persist-credentials: false
|
||||
- uses: actions/setup-python@a309ff8b426b58ec0e2a45f0f869d46889d02405 # v6.2.0
|
||||
|
||||
2
.github/workflows/topic-repos.yml
vendored
2
.github/workflows/topic-repos.yml
vendored
@@ -19,7 +19,7 @@ jobs:
|
||||
env:
|
||||
GITHUB_CONTEXT: ${{ toJson(github) }}
|
||||
run: echo "$GITHUB_CONTEXT"
|
||||
- uses: actions/checkout@de0fac2e4500dabe0009e67214ff5f5447ce83dd # v6.0.2
|
||||
- uses: actions/checkout@df4cb1c069e1874edd31b4311f1884172cec0e10 # v6.0.3
|
||||
with:
|
||||
persist-credentials: true # Required for `git push` in `topic_repos.py`
|
||||
- name: Set up Python
|
||||
|
||||
6
.github/workflows/translate.yml
vendored
6
.github/workflows/translate.yml
vendored
@@ -50,7 +50,7 @@ jobs:
|
||||
langs: ${{ steps.show-langs.outputs.langs }}
|
||||
commands: ${{ steps.show-langs.outputs.commands }}
|
||||
steps:
|
||||
- uses: actions/checkout@de0fac2e4500dabe0009e67214ff5f5447ce83dd # v6.0.2
|
||||
- uses: actions/checkout@df4cb1c069e1874edd31b4311f1884172cec0e10 # v6.0.3
|
||||
with:
|
||||
persist-credentials: false
|
||||
- name: Set up Python
|
||||
@@ -92,7 +92,7 @@ jobs:
|
||||
env:
|
||||
GITHUB_CONTEXT: ${{ toJson(github) }}
|
||||
run: echo "$GITHUB_CONTEXT"
|
||||
- uses: actions/checkout@de0fac2e4500dabe0009e67214ff5f5447ce83dd # v6.0.2
|
||||
- uses: actions/checkout@df4cb1c069e1874edd31b4311f1884172cec0e10 # v6.0.3
|
||||
with:
|
||||
fetch-depth: 0
|
||||
persist-credentials: true # Required for `git push` in `translate.py`
|
||||
@@ -113,7 +113,7 @@ jobs:
|
||||
run: uv sync --locked --no-dev --group github-actions --group translations
|
||||
# Allow debugging with tmate
|
||||
- name: Setup tmate session
|
||||
uses: mxschmitt/action-tmate@c0afd6f790e3a5564914980036ebf83216678101 # v3.23
|
||||
uses: mxschmitt/action-tmate@35b54afac29c97fb54faba5b513f8fbd1882f113 # v3.24
|
||||
if: ${{ github.event_name == 'workflow_dispatch' && github.event.inputs.debug_enabled == 'true' }}
|
||||
with:
|
||||
limit-access-to-actor: true
|
||||
|
||||
2
.github/workflows/zizmor.yml
vendored
2
.github/workflows/zizmor.yml
vendored
@@ -17,7 +17,7 @@ jobs:
|
||||
security-events: write # Required for upload-sarif (used by zizmor-action) to upload SARIF files.
|
||||
steps:
|
||||
- name: Checkout repository
|
||||
uses: actions/checkout@de0fac2e4500dabe0009e67214ff5f5447ce83dd # v6.0.2
|
||||
uses: actions/checkout@df4cb1c069e1874edd31b4311f1884172cec0e10 # v6.0.3
|
||||
with:
|
||||
persist-credentials: false
|
||||
- name: Run zizmor
|
||||
|
||||
@@ -1,48 +1,48 @@
|
||||
# 集成 WSGI - Flask、Django 等 { #including-wsgi-flask-django-others }
|
||||
# 包含 WSGI - Flask,Django,其它 { #including-wsgi-flask-django-others }
|
||||
|
||||
你可以像在 [子应用 - 挂载](sub-applications.md)、[在代理后](behind-a-proxy.md) 里那样挂载 WSGI 应用。
|
||||
您可以挂载 WSGI 应用,正如您在 [子应用 - 挂载](sub-applications.md)、[在代理之后](behind-a-proxy.md) 中所看到的那样。
|
||||
|
||||
为此,用 `WSGIMiddleware` 包一层你的 WSGI 应用,比如 Flask、Django 等。
|
||||
为此, 您可以使用 `WSGIMiddleware` 来包装你的 WSGI 应用,如:Flask,Django,等等。
|
||||
|
||||
## 使用 `WSGIMiddleware` { #using-wsgimiddleware }
|
||||
|
||||
/// note | 注意
|
||||
/// info | 信息
|
||||
|
||||
需要先安装 `a2wsgi`,比如运行 `pip install a2wsgi`。
|
||||
需要安装 `a2wsgi`,例如使用 `pip install a2wsgi`。
|
||||
|
||||
///
|
||||
|
||||
从 `a2wsgi` 导入 `WSGIMiddleware`。
|
||||
您需要从 `a2wsgi` 导入 `WSGIMiddleware`。
|
||||
|
||||
然后用这个中间件包住 WSGI 应用(比如 Flask)。
|
||||
然后使用该中间件包装 WSGI 应用(例如 Flask)。
|
||||
|
||||
再把它挂载到某个路径下。
|
||||
之后将其挂载到某一个路径下。
|
||||
|
||||
{* ../../docs_src/wsgi/tutorial001_py310.py hl[1,3,23] *}
|
||||
|
||||
/// note | 注意
|
||||
|
||||
以前推荐用 `fastapi.middleware.wsgi` 里的 `WSGIMiddleware`,现在已弃用。
|
||||
之前推荐使用 `fastapi.middleware.wsgi` 中的 `WSGIMiddleware`,但它现在已被弃用。
|
||||
|
||||
建议改用 `a2wsgi` 包。用法不变。
|
||||
建议改用 `a2wsgi` 包,使用方式保持不变。
|
||||
|
||||
只要确保安装了 `a2wsgi`,并从 `a2wsgi` 正确导入 `WSGIMiddleware`。
|
||||
只要确保已安装 `a2wsgi` 包,并且从 `a2wsgi` 正确导入 `WSGIMiddleware` 即可。
|
||||
|
||||
///
|
||||
|
||||
## 试一下 { #check-it }
|
||||
## 检查 { #check-it }
|
||||
|
||||
现在,路径 `/v1/` 下的请求都会由 Flask 应用处理。
|
||||
现在,所有定义在 `/v1/` 路径下的请求将会被 Flask 应用处理。
|
||||
|
||||
其他路径走 **FastAPI**。
|
||||
其余的请求则会被 **FastAPI** 处理。
|
||||
|
||||
运行后,打开 [http://localhost:8000/v1/](http://localhost:8000/v1/),能看到来自 Flask 的响应:
|
||||
如果你运行它并访问 [http://localhost:8000/v1/](http://localhost:8000/v1/),你将会看到由 Flask 返回的响应:
|
||||
|
||||
```txt
|
||||
Hello, World from Flask!
|
||||
```
|
||||
|
||||
打开 [http://localhost:8000/v2](http://localhost:8000/v2),能看到来自 FastAPI 的响应:
|
||||
如果你访问 [http://localhost:8000/v2](http://localhost:8000/v2),你将会看到由 FastAPI 返回的响应:
|
||||
|
||||
```JSON
|
||||
{
|
||||
|
||||
@@ -13,7 +13,7 @@ include_yaml:
|
||||
<a href="https://fastapi.tiangolo.com/zh"><img src="https://fastapi.tiangolo.com/img/logo-margin/logo-teal.png" alt="FastAPI"></a>
|
||||
</p>
|
||||
<p align="center">
|
||||
<em>FastAPI 框架,高性能。容易上手。开发更快。开箱即用,能上生产。</em>
|
||||
<em>FastAPI 框架,高性能,易于学习,高效编码,生产可用</em>
|
||||
</p>
|
||||
<p align="center">
|
||||
<a href="https://github.com/fastapi/fastapi/actions?query=workflow%3ATest+event%3Apush+branch%3Amaster">
|
||||
@@ -32,26 +32,26 @@ include_yaml:
|
||||
|
||||
---
|
||||
|
||||
文档: [https://fastapi.tiangolo.com/zh](https://fastapi.tiangolo.com/zh)
|
||||
**文档**: [https://fastapi.tiangolo.com/zh](https://fastapi.tiangolo.com/zh)
|
||||
|
||||
源码: [https://github.com/fastapi/fastapi](https://github.com/fastapi/fastapi)
|
||||
**源码**: [https://github.com/fastapi/fastapi](https://github.com/fastapi/fastapi)
|
||||
|
||||
---
|
||||
|
||||
FastAPI 是一个现代、快速(高性能)的 Web 框架。用标准的 Python 类型标注来构建 API。
|
||||
FastAPI 是一个用于构建 API 的现代、快速(高性能)的 Web 框架,使用 Python 并基于标准的 Python 类型提示。
|
||||
|
||||
核心特性:
|
||||
关键特性:
|
||||
|
||||
* 快:性能很高。和 **NodeJS**、**Go** 一个量级(得益于 Starlette 和 Pydantic)。[Python 里最快的框架之一](#performance)。
|
||||
* 开发快:开发效率提升大约 200% 到 300%。*
|
||||
* 更少的 bug:减少大约 40% 的人为(开发者)错误。*
|
||||
* 直观:编辑器支持好。<dfn title="也称为:自动补全、autocompletion、IntelliSense">补全</dfn> 无处不在。更少调试时间。
|
||||
* 简单:易用、易学。更少查文档时间。
|
||||
* 精简:最小化重复代码。一次声明,多处生效。更少 bug。
|
||||
* 稳健:代码上生产。自带交互式文档。
|
||||
* 基于标准:完全兼容 API 开放标准:[OpenAPI](https://github.com/OAI/OpenAPI-Specification)(以前叫 Swagger)和 [JSON Schema](https://json-schema.org/)。
|
||||
* **快速**:极高性能,可与 **NodeJS** 和 **Go** 并肩(归功于 Starlette 和 Pydantic)。[最快的 Python 框架之一](#performance)。
|
||||
* **高效编码**:功能开发速度提升约 200% ~ 300%。*
|
||||
* **更少 bug**:人为(开发者)错误减少约 40%。*
|
||||
* **直观**:极佳的编辑器支持。处处皆可<dfn title="也被称为:自动完成、自动补全、IntelliSense">自动补全</dfn>。更少的调试时间。
|
||||
* **易用**:为易用和易学而设计。更少的文档阅读时间。
|
||||
* **简短**:最小化代码重复。一次参数声明即可获得多种功能。更少的 bug。
|
||||
* **健壮**:生产可用级代码。并带有自动生成的交互式文档。
|
||||
* **标准化**:基于(并完全兼容)API 的开放标准:[OpenAPI](https://github.com/OAI/OpenAPI-Specification)(以前称为 Swagger)和 [JSON Schema](https://json-schema.org/)。
|
||||
|
||||
<small>* 基于内部团队在真实生产项目中的测试估算。</small>
|
||||
<small>* 基于某内部开发团队在构建生产应用时的测试估算。</small>
|
||||
|
||||
## 赞助商 { #sponsors }
|
||||
|
||||
@@ -65,7 +65,7 @@ FastAPI 是一个现代、快速(高性能)的 Web 框架。用标准的 Pyt
|
||||
{% endfor -%}
|
||||
</div>
|
||||
|
||||
### 黄金赞助商 { #gold-sponsors }
|
||||
### 金牌赞助商 { #gold-sponsors }
|
||||
|
||||
<div class="fastapi-sponsors fastapi-sponsors--gold">
|
||||
{% for sponsor in sponsors.gold -%}
|
||||
@@ -73,7 +73,7 @@ FastAPI 是一个现代、快速(高性能)的 Web 框架。用标准的 Pyt
|
||||
{% endfor -%}
|
||||
</div>
|
||||
|
||||
### 白银赞助商 { #silver-sponsors }
|
||||
### 银牌赞助商 { #silver-sponsors }
|
||||
|
||||
<div class="fastapi-sponsors fastapi-sponsors--silver">
|
||||
{% for sponsor in sponsors.silver -%}
|
||||
@@ -105,19 +105,19 @@ FastAPI 是一个现代、快速(高性能)的 Web 框架。用标准的 Pyt
|
||||
</div>
|
||||
|
||||
<div class="fastapi-opinions__panel" id="fo-panel-microsoft" role="tabpanel" aria-labelledby="fo-tab-microsoft" tabindex="0">
|
||||
<blockquote class="fastapi-opinions__quote">“我这段时间用 <strong>FastAPI</strong> 用得很多。打算把我们团队在 <strong>Microsoft 的 ML 服务</strong>全都切到它上面。一些已经集成进核心的 <strong>Windows</strong> 产品,还有一些 <strong>Office</strong> 产品。”</blockquote>
|
||||
<blockquote class="fastapi-opinions__quote">“我最近大量使用 <strong>FastAPI</strong>。我实际上计划把它用于我团队在 <strong>微软的机器学习(ML)服务</strong>。其中一些正在集成进核心 <strong>Windows</strong> 产品以及一些 <strong>Office</strong> 产品。”</blockquote>
|
||||
<div class="fastapi-opinions__attr">— Kabir Khan,<strong>Microsoft</strong> <a href="https://github.com/fastapi/fastapi/pull/26">(ref)</a></div>
|
||||
</div>
|
||||
<div class="fastapi-opinions__panel" id="fo-panel-uber" role="tabpanel" aria-labelledby="fo-tab-uber" tabindex="0" hidden>
|
||||
<blockquote class="fastapi-opinions__quote">“我们采用了 <strong>FastAPI</strong> 库来启动一个 <strong>REST</strong> 服务器,通过它查询得到<strong>预测</strong>。” <em>[用于 Ludwig]</em></blockquote>
|
||||
<div class="fastapi-opinions__attr">— Piero Molino, Yaroslav Dudin, Sai Sumanth Miryala,<strong>Uber</strong> <a href="https://eng.uber.com/ludwig-v0-2/">(ref)</a></div>
|
||||
<blockquote class="fastapi-opinions__quote">“我们采用了 <strong>FastAPI</strong> 库来启动一个可查询获取<strong>预测结果</strong>的 <strong>REST</strong> 服务器。” <em>[用于 Ludwig]</em></blockquote>
|
||||
<div class="fastapi-opinions__attr">— Piero Molino,Yaroslav Dudin,Sai Sumanth Miryala,<strong>Uber</strong> <a href="https://eng.uber.com/ludwig-v0-2/">(ref)</a></div>
|
||||
</div>
|
||||
<div class="fastapi-opinions__panel" id="fo-panel-netflix" role="tabpanel" aria-labelledby="fo-tab-netflix" tabindex="0" hidden>
|
||||
<blockquote class="fastapi-opinions__quote">“<strong>Netflix</strong> 很高兴开源我们的<strong>危机管理</strong>编排框架:<strong>Dispatch</strong>!” <em>[基于 FastAPI 构建]</em></blockquote>
|
||||
<div class="fastapi-opinions__attr">— Kevin Glisson, Marc Vilanova, Forest Monsen,<strong>Netflix</strong> <a href="https://netflixtechblog.com/introducing-dispatch-da4b8a2a8072">(ref)</a></div>
|
||||
<blockquote class="fastapi-opinions__quote">“<strong>Netflix</strong> 很高兴宣布开源我们的<strong>危机管理</strong>编排框架:<strong>Dispatch</strong>!” <em>[使用 FastAPI 构建]</em></blockquote>
|
||||
<div class="fastapi-opinions__attr">— Kevin Glisson,Marc Vilanova,Forest Monsen,<strong>Netflix</strong> <a href="https://netflixtechblog.com/introducing-dispatch-da4b8a2a8072">(ref)</a></div>
|
||||
</div>
|
||||
<div class="fastapi-opinions__panel" id="fo-panel-cisco" role="tabpanel" aria-labelledby="fo-tab-cisco" tabindex="0" hidden>
|
||||
<blockquote class="fastapi-opinions__quote">“如果你在找生产可用的 Python API 框架,我强烈推荐 <strong>FastAPI</strong>。它<strong>设计优雅</strong>、<strong>简单易用</strong>、<strong>可扩展性强</strong>——已经成了我们 API-first 开发战略的<strong>关键组件</strong>。”</blockquote>
|
||||
<blockquote class="fastapi-opinions__quote">“如果有人正在构建生产级的 Python API,我强烈推荐 <strong>FastAPI</strong>。它<strong>设计优雅</strong>、<strong>使用简单</strong>且<strong>高度可扩展</strong> —— 它已经成为我们 API 优先开发战略中的<strong>关键组件</strong>。”</blockquote>
|
||||
<div class="fastapi-opinions__attr">— Deon Pillsbury,<strong>Cisco</strong> <a href="https://www.linkedin.com/posts/deonpillsbury_cisco-cx-python-activity-6963242628536487936-trAp/">(ref)</a></div>
|
||||
</div>
|
||||
</div>
|
||||
@@ -125,25 +125,25 @@ FastAPI 是一个现代、快速(高性能)的 Web 框架。用标准的 Pyt
|
||||
|
||||
<div class="only-github" markdown="1">
|
||||
|
||||
“_[...] 我这段时间用 **FastAPI** 用得很多。[...] 打算把我们团队在 **Microsoft 的 ML 服务**全都切到它上面。一些已经集成进核心的 **Windows** 产品,还有一些 **Office** 产品。_”
|
||||
「_[...] 我最近大量使用 **FastAPI**。[...] 我实际上计划把它用于我团队在 **微软的机器学习(ML)服务**。其中一些正在集成进核心 **Windows** 产品以及一些 **Office** 产品。_」
|
||||
|
||||
<div style="text-align: right; margin-right: 10%;">Kabir Khan - <strong>Microsoft</strong> <a href="https://github.com/fastapi/fastapi/pull/26"><small>(ref)</small></a></div>
|
||||
|
||||
---
|
||||
|
||||
“_我们采用了 **FastAPI** 库来启动一个 **REST** 服务器,通过它查询得到**预测**。 [用于 Ludwig]_”
|
||||
「_我们采用 **FastAPI** 库来启动一个可查询以获取**预测结果**的 **REST** 服务器。[用于 Ludwig]_」
|
||||
|
||||
<div style="text-align: right; margin-right: 10%;">Piero Molino, Yaroslav Dudin, and Sai Sumanth Miryala - <strong>Uber</strong> <a href="https://eng.uber.com/ludwig-v0-2/"><small>(ref)</small></a></div>
|
||||
<div style="text-align: right; margin-right: 10%;">Piero Molino,Yaroslav Dudin,Sai Sumanth Miryala - <strong>Uber</strong> <a href="https://eng.uber.com/ludwig-v0-2/"><small>(ref)</small></a></div>
|
||||
|
||||
---
|
||||
|
||||
“_**Netflix** 很高兴开源我们的**危机管理**编排框架:**Dispatch**![基于 **FastAPI** 构建]_”
|
||||
「_**Netflix** 很高兴宣布开源我们的**危机管理**编排框架:**Dispatch**![使用 **FastAPI** 构建]_」
|
||||
|
||||
<div style="text-align: right; margin-right: 10%;">Kevin Glisson, Marc Vilanova, Forest Monsen - <strong>Netflix</strong> <a href="https://netflixtechblog.com/introducing-dispatch-da4b8a2a8072"><small>(ref)</small></a></div>
|
||||
<div style="text-align: right; margin-right: 10%;">Kevin Glisson,Marc Vilanova,Forest Monsen - <strong>Netflix</strong> <a href="https://netflixtechblog.com/introducing-dispatch-da4b8a2a8072"><small>(ref)</small></a></div>
|
||||
|
||||
---
|
||||
|
||||
“_如果你在找生产可用的 Python API 框架,我强烈推荐 **FastAPI**。它**设计优雅**、**简单易用**、**可扩展性强**,已经成了我们 API-first 开发战略的**关键组件**,驱动了很多自动化和服务,比如我们的 Virtual TAC Engineer。_”
|
||||
「_如果有人正在构建生产级的 Python API,我强烈推荐 **FastAPI**。它**设计优雅**、**使用简单**且**高度可扩展**,它已经成为我们 API 优先开发战略中的**关键组件**,并驱动了许多自动化和服务,比如我们的 Virtual TAC Engineer。_」
|
||||
|
||||
<div style="text-align: right; margin-right: 10%;">Deon Pillsbury - <strong>Cisco</strong> <a href="https://www.linkedin.com/posts/deonpillsbury_cisco-cx-python-activity-6963242628536487936-trAp/"><small>(ref)</small></a></div>
|
||||
|
||||
@@ -153,34 +153,34 @@ FastAPI 是一个现代、快速(高性能)的 Web 框架。用标准的 Pyt
|
||||
|
||||
## FastAPI 大会 { #fastapi-conf }
|
||||
|
||||
[**FastAPI Conf '26**](https://fastapiconf.com) 将在 **2026 年 10 月 28 日** 于 **荷兰阿姆斯特丹** 举办。全是 FastAPI 干货,来自源头。🎤
|
||||
[**FastAPI Conf '26**](https://fastapiconf.com) 将于 **2026 年 10 月 28 日** 在 **荷兰阿姆斯特丹** 举行。来自源头的 FastAPI 干货。🎤
|
||||
|
||||
<a class="fastapi-feature-banner" href="https://fastapiconf.com"><img src="https://fastapi.tiangolo.com/img/fastapi-conf.jpeg" alt="FastAPI Conf '26 - October 28, 2026 - Amsterdam, NL"></a>
|
||||
<a class="fastapi-feature-banner" href="https://fastapiconf.com"><img src="https://fastapi.tiangolo.com/img/fastapi-conf.jpeg" alt="FastAPI Conf '26 - 2026 年 10 月 28 日 - 荷兰阿姆斯特丹"></a>
|
||||
|
||||
## FastAPI 微纪录片 { #fastapi-mini-documentary }
|
||||
## FastAPI 迷你纪录片 { #fastapi-mini-documentary }
|
||||
|
||||
这里有一部 [FastAPI 微纪录片](https://www.youtube.com/watch?v=mpR8ngthqiE),在 2025 年底发布。可以在线看:
|
||||
在 2025 年末发布了一部 [FastAPI 迷你纪录片](https://www.youtube.com/watch?v=mpR8ngthqiE),你可以在线观看:
|
||||
|
||||
<a class="fastapi-feature-banner" href="https://www.youtube.com/watch?v=mpR8ngthqiE"><img src="https://fastapi.tiangolo.com/img/fastapi-documentary.jpg" alt="FastAPI Mini Documentary"></a>
|
||||
<a class="fastapi-feature-banner" href="https://www.youtube.com/watch?v=mpR8ngthqiE"><img src="https://fastapi.tiangolo.com/img/fastapi-documentary.jpg" alt="FastAPI 迷你纪录片"></a>
|
||||
|
||||
## Typer:CLI 里的 FastAPI { #typer-the-fastapi-of-clis }
|
||||
## **Typer**,命令行中的 FastAPI { #typer-the-fastapi-of-clis }
|
||||
|
||||
<a href="https://typer.tiangolo.com"><img src="https://typer.tiangolo.com/img/logo-margin/logo-margin-vector.svg" style="width: 20%;"></a>
|
||||
|
||||
如果你要做一个终端里用的 <abbr title="Command Line Interface - 命令行界面">CLI</abbr> 应用,不是 Web API,看看 [**Typer**](https://typer.tiangolo.com/)。
|
||||
如果你要开发一个用于终端而不是 Web API 的 <abbr title="Command Line Interface - 命令行界面">CLI</abbr> 应用,看看 [**Typer**](https://typer.tiangolo.com/)。
|
||||
|
||||
**Typer** 是 FastAPI 的小老弟。目标是做 **CLI 里的 FastAPI**。⌨️ 🚀
|
||||
**Typer** 是 FastAPI 的小同胞。它的目标是成为**命令行中的 FastAPI**。⌨️ 🚀
|
||||
|
||||
## 依赖和基座 { #requirements }
|
||||
## 依赖 { #requirements }
|
||||
|
||||
FastAPI 站在巨人肩膀上:
|
||||
FastAPI 站在巨人的肩膀之上:
|
||||
|
||||
* [Starlette](https://www.starlette.dev/) 负责 Web 部分。
|
||||
* [Pydantic](https://docs.pydantic.dev/) 负责数据部分。
|
||||
|
||||
## 安装 { #installation }
|
||||
|
||||
先创建并激活一个[虚拟环境](https://fastapi.tiangolo.com/zh/virtual-environments/),然后安装 FastAPI:
|
||||
创建并激活一个 [虚拟环境](https://fastapi.tiangolo.com/zh/virtual-environments/),然后安装 FastAPI:
|
||||
|
||||
<div class="termy">
|
||||
|
||||
@@ -192,13 +192,13 @@ $ pip install "fastapi[standard]"
|
||||
|
||||
</div>
|
||||
|
||||
注意:把 "fastapi[standard]" 加上引号。所有终端都能正常识别。
|
||||
**Note**: 请确保把 `"fastapi[standard]"` 用引号包起来,以保证在所有终端中都能正常工作。
|
||||
|
||||
## 示例 { #example }
|
||||
|
||||
### 创建 { #create-it }
|
||||
|
||||
新建文件 `main.py`,写入:
|
||||
创建文件 `main.py`,内容如下:
|
||||
|
||||
```Python
|
||||
from fastapi import FastAPI
|
||||
@@ -217,9 +217,9 @@ def read_item(item_id: int, q: str | None = None):
|
||||
```
|
||||
|
||||
<details markdown="1">
|
||||
<summary>或者用 <code>async def</code>...</summary>
|
||||
<summary>或者使用 <code>async def</code>...</summary>
|
||||
|
||||
如果你的代码用到了 `async` / `await`,就用 `async def`:
|
||||
如果你的代码里会用到 `async` / `await`,请使用 `async def`:
|
||||
|
||||
```Python hl_lines="7 12"
|
||||
from fastapi import FastAPI
|
||||
@@ -237,15 +237,15 @@ async def read_item(item_id: int, q: str | None = None):
|
||||
return {"item_id": item_id, "q": q}
|
||||
```
|
||||
|
||||
注意:
|
||||
**Note**:
|
||||
|
||||
不确定的话,去看「In a hurry?」里关于文档中的 [`async` 和 `await`](https://fastapi.tiangolo.com/zh/async/#in-a-hurry)。
|
||||
如果你不确定,请查看文档中 _"In a hurry?"_ 章节的 [`async` 和 `await`](https://fastapi.tiangolo.com/zh/async/#in-a-hurry) 部分。
|
||||
|
||||
</details>
|
||||
|
||||
### 运行 { #run-it }
|
||||
|
||||
启动服务:
|
||||
用下面的命令运行服务器:
|
||||
|
||||
<div class="termy">
|
||||
|
||||
@@ -275,54 +275,54 @@ INFO: Application startup complete.
|
||||
</div>
|
||||
|
||||
<details markdown="1">
|
||||
<summary>关于 <code>fastapi dev</code> 命令...</summary>
|
||||
<summary>关于命令 <code>fastapi dev</code>...</summary>
|
||||
|
||||
`fastapi dev` 会自动读取你的 `main.py`,检测里面的 **FastAPI** 应用,然后用 [Uvicorn](https://www.uvicorn.dev) 启动服务器。
|
||||
`fastapi dev` 命令会读取你的 `main.py` 文件,检测其中的 **FastAPI** 应用,并使用 [Uvicorn](https://www.uvicorn.dev) 启动服务器。
|
||||
|
||||
默认开启自动重载,方便本地开发。
|
||||
默认情况下,`fastapi dev` 会在本地开发时启用自动重载。
|
||||
|
||||
更多见 [FastAPI CLI 文档](https://fastapi.tiangolo.com/zh/fastapi-cli/)。
|
||||
你可以在 [FastAPI CLI 文档](https://fastapi.tiangolo.com/zh/fastapi-cli/) 中了解更多。
|
||||
|
||||
</details>
|
||||
|
||||
### 查看 { #check-it }
|
||||
### 检查 { #check-it }
|
||||
|
||||
打开浏览器访问 [http://127.0.0.1:8000/items/5?q=somequery](http://127.0.0.1:8000/items/5?q=somequery)。
|
||||
用浏览器打开 [http://127.0.0.1:8000/items/5?q=somequery](http://127.0.0.1:8000/items/5?q=somequery)。
|
||||
|
||||
你会看到 JSON 响应:
|
||||
你会看到如下 JSON 响应:
|
||||
|
||||
```JSON
|
||||
{"item_id": 5, "q": "somequery"}
|
||||
```
|
||||
|
||||
你已经写好了一个 API,它:
|
||||
你已经创建了一个 API,它可以:
|
||||
|
||||
* 接收 `/` 和 `/items/{item_id}` 两个路径的 HTTP 请求。
|
||||
* 这两个路径都接收 `GET` 操作(也叫 HTTP 方法)。
|
||||
* `/items/{item_id}` 的路径参数 `item_id` 必须是 `int`。
|
||||
* `/items/{item_id}` 还有一个可选的 `str` 类型查询参数 `q`。
|
||||
* 在路径 `/` 和 `/items/{item_id}` 接收 HTTP 请求。
|
||||
* 以上两个路径都接受 `GET` <em>操作</em>(也称为 HTTP <em>方法</em>)。
|
||||
* 路径 `/items/{item_id}` 有一个应为 `int` 的<em>路径参数</em> `item_id`。
|
||||
* 路径 `/items/{item_id}` 有一个可选的 `str` 类型<em>查询参数</em> `q`。
|
||||
|
||||
### 交互式 API 文档 { #interactive-api-docs }
|
||||
|
||||
访问 [http://127.0.0.1:8000/docs](http://127.0.0.1:8000/docs)。
|
||||
现在访问 [http://127.0.0.1:8000/docs](http://127.0.0.1:8000/docs)。
|
||||
|
||||
你会看到自动生成的交互式 API 文档(由 [Swagger UI](https://github.com/swagger-api/swagger-ui) 提供):
|
||||
|
||||

|
||||
|
||||
### 另一套 API 文档 { #alternative-api-docs }
|
||||
### 可选的 API 文档 { #alternative-api-docs }
|
||||
|
||||
再访问 [http://127.0.0.1:8000/redoc](http://127.0.0.1:8000/redoc)。
|
||||
然后访问 [http://127.0.0.1:8000/redoc](http://127.0.0.1:8000/redoc)。
|
||||
|
||||
你会看到另一套自动文档(由 [ReDoc](https://github.com/Rebilly/ReDoc) 提供):
|
||||
你会看到另一个自动生成的文档(由 [ReDoc](https://github.com/Rebilly/ReDoc) 提供):
|
||||
|
||||

|
||||
|
||||
## 升级示例 { #example-upgrade }
|
||||
## 示例升级 { #example-upgrade }
|
||||
|
||||
现在改一下 `main.py`,让它能接收 `PUT` 请求的 body。
|
||||
现在修改 `main.py` 文件来接收来自 `PUT` 请求的请求体。
|
||||
|
||||
用标准 Python 类型声明 body,多亏了 Pydantic:
|
||||
借助 Pydantic,使用标准的 Python 类型来声明请求体。
|
||||
|
||||
```Python hl_lines="2 7-10 23-25"
|
||||
from fastapi import FastAPI
|
||||
@@ -352,43 +352,43 @@ def update_item(item_id: int, item: Item):
|
||||
return {"item_name": item.name, "item_id": item_id}
|
||||
```
|
||||
|
||||
`fastapi dev` 会自动重载。
|
||||
`fastapi dev` 服务器会自动重载。
|
||||
|
||||
### 交互式文档同步升级 { #interactive-api-docs-upgrade }
|
||||
### 交互式 API 文档升级 { #interactive-api-docs-upgrade }
|
||||
|
||||
访问 [http://127.0.0.1:8000/docs](http://127.0.0.1:8000/docs)。
|
||||
现在访问 [http://127.0.0.1:8000/docs](http://127.0.0.1:8000/docs)。
|
||||
|
||||
* 交互式文档会自动更新。包含新的 body:
|
||||
* 交互式 API 文档会自动更新,并包含新的请求体:
|
||||
|
||||

|
||||
|
||||
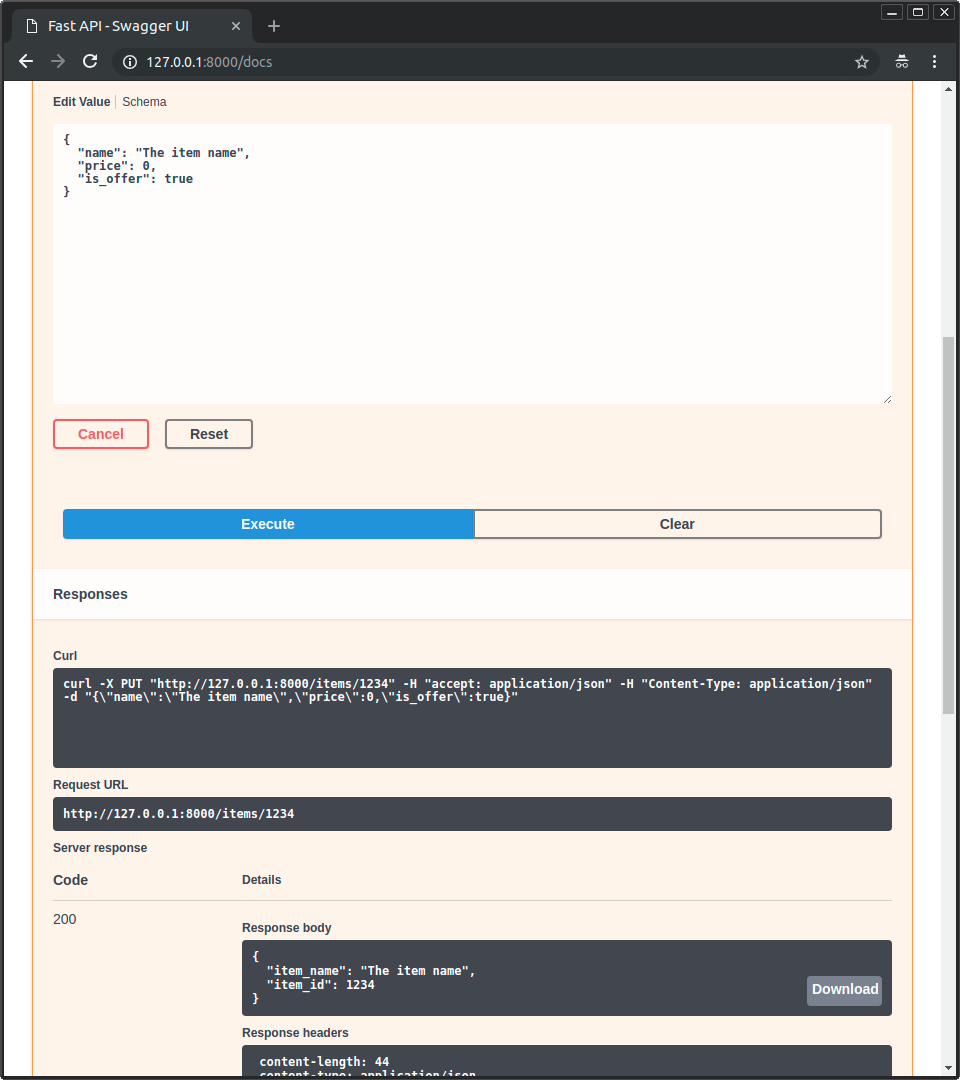
* 点 “Try it out” 按钮。可以填参数,直接和 API 交互:
|
||||
* 点击「Try it out」按钮,它允许你填写参数并直接与 API 交互:
|
||||
|
||||

|
||||
|
||||
* 然后点 “Execute”。界面会调用你的 API,发送参数,拿到结果并展示:
|
||||
* 然后点击「Execute」按钮,界面会与你的 API 通信、发送参数、获取结果并在屏幕上展示:
|
||||
|
||||
|
||||
|
||||
### 另一套文档同步升级 { #alternative-api-docs-upgrade }
|
||||
### 可选文档升级 { #alternative-api-docs-upgrade }
|
||||
|
||||
再访问 [http://127.0.0.1:8000/redoc](http://127.0.0.1:8000/redoc)。
|
||||
|
||||
* 这套文档也会反映新的查询参数和 body:
|
||||
* 可选文档同样会体现新的查询参数和请求体:
|
||||
|
||||

|
||||
|
||||
### 小结 { #recap }
|
||||
### 总结 { #recap }
|
||||
|
||||
总结一下。你只需要在函数参数里声明一次参数类型、body 等。
|
||||
总之,你只需要把参数、请求体等的类型作为函数参数**声明一次**。
|
||||
|
||||
用的就是现代标准 Python 类型。
|
||||
这些都使用标准的现代 Python 类型即可。
|
||||
|
||||
不用学一堆新语法、不用背某个库的方法或类。
|
||||
你不需要学习新的语法、某个特定库的方法或类等。
|
||||
|
||||
就是标准的 **Python**。
|
||||
只需要标准的 **Python**。
|
||||
|
||||
比如,一个 `int`:
|
||||
例如,一个 `int`:
|
||||
|
||||
```Python
|
||||
item_id: int
|
||||
@@ -400,101 +400,101 @@ item_id: int
|
||||
item: Item
|
||||
```
|
||||
|
||||
...只要这一个声明,你就能得到:
|
||||
……通过一次声明,你将获得:
|
||||
|
||||
* 编辑器支持,包括:
|
||||
* 补全。
|
||||
* 自动补全。
|
||||
* 类型检查。
|
||||
* 数据校验:
|
||||
* 数据不合法时自动抛出清晰的错误。
|
||||
* 支持深层嵌套 JSON 的校验。
|
||||
* 输入数据的<dfn title="也称为:序列化、解析、封送">转换</dfn>:从网络到 Python 数据和类型。读取来源:
|
||||
* 当数据无效时自动生成清晰的错误信息。
|
||||
* 即便是多层嵌套的 JSON 对象也会进行校验。
|
||||
* <dfn title="也被称为:序列化、解析、编组">转换</dfn>输入数据:从网络读取到 Python 数据和类型。读取来源:
|
||||
* JSON。
|
||||
* 路径参数。
|
||||
* 查询参数。
|
||||
* Cookies。
|
||||
* Headers。
|
||||
* 表单。
|
||||
* 文件。
|
||||
* 输出数据的<dfn title="也称为:序列化、解析、封送">转换</dfn>:从 Python 数据和类型到网络数据(JSON):
|
||||
* 转换 Python 基本类型(`str`、`int`、`float`、`bool`、`list` 等)。
|
||||
* Forms。
|
||||
* Files。
|
||||
* <dfn title="也被称为:序列化、解析、编组">转换</dfn>输出数据:从 Python 数据和类型转换为网络数据(JSON):
|
||||
* 转换 Python 类型(`str`、`int`、`float`、`bool`、`list` 等)。
|
||||
* `datetime` 对象。
|
||||
* `UUID` 对象。
|
||||
* 数据库模型。
|
||||
* ...等等。
|
||||
* 自动生成的交互式 API 文档,有两套 UI:
|
||||
* ……以及更多。
|
||||
* 自动生成的交互式 API 文档,包括两种可选的用户界面:
|
||||
* Swagger UI。
|
||||
* ReDoc。
|
||||
|
||||
---
|
||||
|
||||
回到上面的代码示例,**FastAPI** 会:
|
||||
回到之前的代码示例,**FastAPI** 将会:
|
||||
|
||||
* 校验 `GET` 和 `PUT` 请求的路径里有 `item_id`。
|
||||
* 校验 `GET` 和 `PUT` 请求里的 `item_id` 是 `int`。
|
||||
* 如果不是,客户端会看到清晰有用的错误。
|
||||
* 对 `GET` 到 `/items/{item_id}` 的请求,检查是否有名为 `q` 的可选查询参数(比如 `http://127.0.0.1:8000/items/foo?q=somequery`)。
|
||||
* `q` 参数声明了 `= None`,所以它是可选的。
|
||||
* 去掉 `None` 就会变成必填(`PUT` 里的 body 也是必填)。
|
||||
* 对 `/items/{item_id}` 的 `PUT` 请求,把 body 当作 JSON 读取:
|
||||
* 检查是否有必填属性 `name`,类型为 `str`。
|
||||
* 检查是否有必填属性 `price`,类型为 `float`。
|
||||
* 检查是否有可选属性 `is_offer`,如果有则必须是 `bool`。
|
||||
* 这些校验也适用于深层嵌套的 JSON。
|
||||
* 自动在 JSON 和 Python 之间转换。
|
||||
* 用 OpenAPI 文档化一切,可以被以下工具使用:
|
||||
* 校验 `GET` 和 `PUT` 请求的路径中是否包含 `item_id`。
|
||||
* 校验 `GET` 和 `PUT` 请求中的 `item_id` 是否为 `int` 类型。
|
||||
* 如果不是,客户端会看到清晰有用的错误信息。
|
||||
* 对于 `GET` 请求,检查是否存在名为 `q` 的可选查询参数(如 `http://127.0.0.1:8000/items/foo?q=somequery`)。
|
||||
* 因为参数 `q` 被声明为 `= None`,所以它是可选的。
|
||||
* 如果没有 `None`,它就是必需的(就像 `PUT` 情况下的请求体)。
|
||||
* 对于发送到 `/items/{item_id}` 的 `PUT` 请求,把请求体作为 JSON 读取:
|
||||
* 检查是否存在必需属性 `name`,且为 `str`。
|
||||
* 检查是否存在必需属性 `price`,且为 `float`。
|
||||
* 检查是否存在可选属性 `is_offer`,如果存在则应为 `bool`。
|
||||
* 对于多层嵌套的 JSON 对象,同样适用。
|
||||
* 自动完成 JSON 的读取与输出转换。
|
||||
* 使用 OpenAPI 记录所有内容,可用于:
|
||||
* 交互式文档系统。
|
||||
* 多语言的自动客户端代码生成系统。
|
||||
* 直接提供两套交互式文档 Web 界面。
|
||||
* 多语言的客户端代码自动生成系统。
|
||||
* 直接提供 2 种交互式文档 Web 界面。
|
||||
|
||||
---
|
||||
|
||||
这里只是开了个头,但你已经知道它怎么运作了。
|
||||
我们只是浅尝辄止,但你已经大致了解其工作方式了。
|
||||
|
||||
把这一行:
|
||||
尝试把这一行:
|
||||
|
||||
```Python
|
||||
return {"item_name": item.name, "item_id": item_id}
|
||||
```
|
||||
|
||||
...从:
|
||||
……从:
|
||||
|
||||
```Python
|
||||
... "item_name": item.name ...
|
||||
```
|
||||
|
||||
...改成:
|
||||
……改为:
|
||||
|
||||
```Python
|
||||
... "item_price": item.price ...
|
||||
```
|
||||
|
||||
...看看你的编辑器如何自动补全属性,并且知道它们的类型:
|
||||
……看看你的编辑器如何自动补全属性并知道它们的类型:
|
||||
|
||||

|
||||
|
||||
更完整的示例和更多特性,见 <a href="https://fastapi.tiangolo.com/zh/tutorial/">教程 - 用户指南</a>。
|
||||
更多包含更多特性的完整示例,请参阅 <a href="https://fastapi.tiangolo.com/zh/tutorial/">教程 - 用户指南</a>。
|
||||
|
||||
剧透:教程 - 用户指南包含:
|
||||
**剧透警告**:教程 - 用户指南包括:
|
||||
|
||||
* 从不同位置声明**参数**:**headers**、**cookies**、**表单字段**、**文件**。
|
||||
* 如何设置**校验约束**,比如 `maximum_length` 或 `regex`。
|
||||
* 一个强大且好用的**<dfn title="也称为:组件、资源、提供者、服务、可注入">依赖注入</dfn>**系统。
|
||||
* 安全与认证。包括 **OAuth2**(配合 **JWT tokens**)和 **HTTP Basic**。
|
||||
* 更高级(但一样简单)的**深度嵌套 JSON 模型**声明技巧(感谢 Pydantic)。
|
||||
* **GraphQL** 集成,支持 [Strawberry](https://strawberry.rocks) 等库。
|
||||
* 许多额外特性(感谢 Starlette),比如:
|
||||
* 来自不同位置的**参数**声明:**headers**、**cookies**、**form 字段**和**文件**。
|
||||
* 如何设置**校验约束**,如 `maximum_length` 或 `regex`。
|
||||
* 功能强大且易用的 **<dfn title="也被称为:组件、资源、提供者、服务、可注入项">依赖注入</dfn>** 系统。
|
||||
* 安全与认证,包括对 **OAuth2**、**JWT tokens** 和 **HTTP Basic** 认证的支持。
|
||||
* 更高级(但同样简单)的 **多层嵌套 JSON 模型** 声明技巧(得益于 Pydantic)。
|
||||
* 通过 [Strawberry](https://strawberry.rocks) 等库进行 **GraphQL** 集成。
|
||||
* 许多额外特性(归功于 Starlette),例如:
|
||||
* **WebSockets**
|
||||
* 基于 HTTPX 和 `pytest` 的超简单测试
|
||||
* 基于 HTTPX 和 `pytest` 的极其简单的测试
|
||||
* **CORS**
|
||||
* **Cookie Sessions**
|
||||
* ...等等。
|
||||
* ……以及更多。
|
||||
|
||||
### 部署你的应用(可选) { #deploy-your-app-optional }
|
||||
|
||||
你可以把 FastAPI 应用部署到 [FastAPI Cloud](https://fastapicloud.com)。还没有账号就去等候名单报名。🚀
|
||||
你可以选择把 FastAPI 应用部署到 [FastAPI Cloud](https://fastapicloud.com),如果还没有的话去加入候补名单吧。🚀
|
||||
|
||||
如果你已经有 **FastAPI Cloud** 账号(我们从等候名单邀请了你 😉),只要一条命令就能部署应用。
|
||||
如果你已经有 **FastAPI Cloud** 账号(我们从候补名单邀请了你 😉),你可以用一个命令部署你的应用。
|
||||
|
||||
<div class="termy">
|
||||
|
||||
@@ -510,76 +510,76 @@ Deploying to FastAPI Cloud...
|
||||
|
||||
</div>
|
||||
|
||||
就这些!现在用这个地址就能访问你的应用了。✨
|
||||
就这样!现在你可以通过该 URL 访问你的应用了。✨
|
||||
|
||||
#### 关于 FastAPI Cloud { #about-fastapi-cloud }
|
||||
|
||||
**[FastAPI Cloud](https://fastapicloud.com)** 出自 **FastAPI** 同一位作者和团队。
|
||||
**[FastAPI Cloud](https://fastapicloud.com)** 由 **FastAPI** 的同一位作者和团队打造。
|
||||
|
||||
它让你以最小成本**构建**、**部署**、**访问**一个 API。
|
||||
它让你以最小的工作量就能**构建**、**部署**并**访问**一个 API。
|
||||
|
||||
把用 FastAPI 开发应用时的**开发者体验**,带到了**部署到云上**这一步。🎉
|
||||
它把用 FastAPI 构建应用时的**开发者体验**带到了部署到云上的过程。🎉
|
||||
|
||||
FastAPI Cloud 是「FastAPI and friends」开源项目的主要赞助方和资金来源。✨
|
||||
FastAPI Cloud 是「FastAPI and friends」开源项目的主要赞助方和资金提供者。✨
|
||||
|
||||
#### 部署到其他云厂商 { #deploy-to-other-cloud-providers }
|
||||
|
||||
FastAPI 是开源且基于标准的。你可以部署到任意云厂商。
|
||||
FastAPI 是开源且基于标准的。你可以部署 FastAPI 应用到你选择的任意云厂商。
|
||||
|
||||
按照各家云厂商的指南部署 FastAPI 应用就行。🤓
|
||||
按照你的云厂商的指南部署 FastAPI 应用即可。🤓
|
||||
|
||||
## 性能 { #performance }
|
||||
|
||||
独立的 TechEmpower 基准测试显示,Uvicorn 下运行的 **FastAPI** 应用[是 Python 里最快的框架之一](https://www.techempower.com/benchmarks/#section=test&runid=7464e520-0dc2-473d-bd34-dbdfd7e85911&hw=ph&test=query&l=zijzen-7)。仅次于 Starlette 和 Uvicorn 本身(FastAPI 内部就用到它们)。(*)
|
||||
独立机构 TechEmpower 的基准测试显示,运行在 Uvicorn 下的 **FastAPI** 应用是 [最快的 Python 框架之一](https://www.techempower.com/benchmarks/#section=test&runid=7464e520-0dc2-473d-bd34-dbdfd7e85911&hw=ph&test=query&l=zijzen-7),仅次于 Starlette 和 Uvicorn 本身(FastAPI 内部使用它们)。(*)
|
||||
|
||||
想了解更多,查看[基准测试](https://fastapi.tiangolo.com/zh/benchmarks/)。
|
||||
想了解更多,请参阅 [基准测试](https://fastapi.tiangolo.com/zh/benchmarks/) 章节。
|
||||
|
||||
## 依赖 { #dependencies }
|
||||
## 依赖项 { #dependencies }
|
||||
|
||||
FastAPI 依赖 Pydantic 和 Starlette。
|
||||
|
||||
### `standard` 依赖组 { #standard-dependencies }
|
||||
### `standard` 依赖 { #standard-dependencies }
|
||||
|
||||
用 `pip install "fastapi[standard]"` 安装时,会包含 `standard` 这组可选依赖:
|
||||
当你通过 `pip install "fastapi[standard]"` 安装 FastAPI 时,会包含 `standard` 组的一些可选依赖:
|
||||
|
||||
Pydantic 用到:
|
||||
Pydantic 使用:
|
||||
|
||||
* [`email-validator`](https://github.com/JoshData/python-email-validator) —— 用于邮箱校验。
|
||||
* [`email-validator`](https://github.com/JoshData/python-email-validator) - 用于 email 校验。
|
||||
|
||||
Starlette 用到:
|
||||
Starlette 使用:
|
||||
|
||||
* [`httpx`](https://www.python-httpx.org) —— 想用 `TestClient` 就需要它。
|
||||
* [`jinja2`](https://jinja.palletsprojects.com) —— 想用默认模板配置就需要它。
|
||||
* [`python-multipart`](https://github.com/Kludex/python-multipart) —— 想支持表单<dfn title="把来自 HTTP 请求的字符串转换成 Python 数据">"解析"</dfn>,即 `request.form()`,就需要它。
|
||||
* [`httpx`](https://www.python-httpx.org) - 使用 `TestClient` 时需要。
|
||||
* [`jinja2`](https://jinja.palletsprojects.com) - 使用默认模板配置时需要。
|
||||
* [`python-multipart`](https://github.com/Kludex/python-multipart) - 使用 `request.form()` 支持表单<dfn title="将 HTTP 请求中的字符串转换为 Python 数据">「解析」</dfn>时需要。
|
||||
|
||||
FastAPI 用到:
|
||||
FastAPI 使用:
|
||||
|
||||
* [`uvicorn`](https://www.uvicorn.dev) —— 负责加载和服务你的应用。包含 `uvicorn[standard]`,内置一些高性能服务需要的依赖(比如 `uvloop`)。
|
||||
* `fastapi-cli[standard]` —— 提供 `fastapi` 命令。
|
||||
* 其中包含 `fastapi-cloud-cli`,可把应用部署到 [FastAPI Cloud](https://fastapicloud.com)。
|
||||
* [`uvicorn`](https://www.uvicorn.dev) - 加载并提供你的应用的服务器。包含 `uvicorn[standard]`,其中包含高性能服务所需的一些依赖(例如 `uvloop`)。
|
||||
* `fastapi-cli[standard]` - 提供 `fastapi` 命令。
|
||||
* 其中包含 `fastapi-cloud-cli`,它允许你将 FastAPI 应用部署到 [FastAPI Cloud](https://fastapicloud.com)。
|
||||
|
||||
### 不包含 `standard` 依赖 { #without-standard-dependencies }
|
||||
|
||||
如果不想带上 `standard` 这组可选依赖,就用 `pip install fastapi`,而不是 `pip install "fastapi[standard]"`。
|
||||
如果你不想包含这些 `standard` 可选依赖,可以使用 `pip install fastapi`,而不是 `pip install "fastapi[standard]"`。
|
||||
|
||||
### 不包含 `fastapi-cloud-cli` { #without-fastapi-cloud-cli }
|
||||
|
||||
如果你想安装标准依赖,但去掉 `fastapi-cloud-cli`,可以用 `pip install "fastapi[standard-no-fastapi-cloud-cli]"`。
|
||||
如果你想安装带有 standard 依赖但不包含 `fastapi-cloud-cli` 的 FastAPI,可以使用 `pip install "fastapi[standard-no-fastapi-cloud-cli]"`。
|
||||
|
||||
### 额外可选依赖 { #additional-optional-dependencies }
|
||||
### 其他可选依赖 { #additional-optional-dependencies }
|
||||
|
||||
还有一些你可能会用到的额外依赖。
|
||||
还有一些你可能想安装的可选依赖。
|
||||
|
||||
Pydantic 的可选依赖:
|
||||
额外的 Pydantic 可选依赖:
|
||||
|
||||
* [`pydantic-settings`](https://docs.pydantic.dev/latest/usage/pydantic_settings/) —— 管理配置。
|
||||
* [`pydantic-extra-types`](https://docs.pydantic.dev/latest/usage/types/extra_types/extra_types/) —— 更多可用于 Pydantic 的类型。
|
||||
* [`pydantic-settings`](https://docs.pydantic.dev/latest/usage/pydantic_settings/) - 用于配置管理。
|
||||
* [`pydantic-extra-types`](https://docs.pydantic.dev/latest/usage/types/extra_types/extra_types/) - 用于在 Pydantic 中使用的额外类型。
|
||||
|
||||
FastAPI 的可选依赖:
|
||||
额外的 FastAPI 可选依赖:
|
||||
|
||||
* [`orjson`](https://github.com/ijl/orjson) —— 想用 `ORJSONResponse` 就需要它。
|
||||
* [`ujson`](https://github.com/esnme/ultrajson) —— 想用 `UJSONResponse` 就需要它。
|
||||
* [`orjson`](https://github.com/ijl/orjson) - 使用 `ORJSONResponse` 时需要。
|
||||
* [`ujson`](https://github.com/esnme/ultrajson) - 使用 `UJSONResponse` 时需要。
|
||||
|
||||
## 许可证 { #license }
|
||||
## 许可协议 { #license }
|
||||
|
||||
本项目使用 MIT 许可证。
|
||||
该项目遵循 MIT 许可协议。
|
||||
|
||||
@@ -1,84 +1,84 @@
|
||||
# 后台任务 { #background-tasks }
|
||||
|
||||
你可以定义后台任务。它会在返回响应之后运行。
|
||||
你可以定义在返回响应后运行的后台任务。
|
||||
|
||||
这适合那些请求后需要做,但没必要让客户端等着的操作。
|
||||
这对需要在请求之后执行的操作很有用,但客户端不必在接收响应之前等待操作完成。
|
||||
|
||||
比如:
|
||||
包括这些例子:
|
||||
|
||||
* 动作完成后发邮件通知:
|
||||
* 连接邮件服务器并发送邮件比较慢(要几秒)。可以先返回响应,把发邮件放到后台跑。
|
||||
* 执行操作后发送的电子邮件通知:
|
||||
* 由于连接到电子邮件服务器并发送电子邮件往往很“慢”(几秒钟),您可以立即返回响应并在后台发送电子邮件通知。
|
||||
* 处理数据:
|
||||
* 比如你收到一个需要慢处理的文件。可以先返回 "Accepted"(HTTP 202),把文件在后台处理。
|
||||
* 例如,假设您收到的文件必须经过一个缓慢的过程,您可以返回一个"Accepted"(HTTP 202)响应并在后台处理它。
|
||||
|
||||
## 使用 `BackgroundTasks` { #using-backgroundtasks }
|
||||
|
||||
先导入 `BackgroundTasks`。在你的*路径操作函数*里声明一个类型为 `BackgroundTasks` 的参数:
|
||||
首先导入 `BackgroundTasks` 并在 *路径操作函数* 中使用类型声明 `BackgroundTasks` 定义一个参数:
|
||||
|
||||
{* ../../docs_src/background_tasks/tutorial001_py310.py hl[1,13] *}
|
||||
|
||||
**FastAPI** 会帮你创建 `BackgroundTasks` 实例,并注入到这个参数里。
|
||||
**FastAPI** 会创建一个 `BackgroundTasks` 类型的对象并作为该参数传入。
|
||||
|
||||
## 写任务函数 { #create-a-task-function }
|
||||
## 创建一个任务函数 { #create-a-task-function }
|
||||
|
||||
写一个要在后台跑的函数。
|
||||
创建要作为后台任务运行的函数。
|
||||
|
||||
就是普通函数。可以接收参数。
|
||||
它只是一个可以接收参数的标准函数。
|
||||
|
||||
可以是 `async def`,也可以是普通 `def`。**FastAPI** 都能正确处理。
|
||||
它可以是 `async def` 或普通的 `def` 函数,**FastAPI** 知道如何正确处理。
|
||||
|
||||
这个例子里,任务函数会写文件(模拟发邮件)。
|
||||
在这种情况下,任务函数将写入一个文件(模拟发送电子邮件)。
|
||||
|
||||
写文件不需要 `async/await`,所以用普通 `def`:
|
||||
由于写操作不使用 `async` 和 `await`,我们用普通的 `def` 定义函数:
|
||||
|
||||
{* ../../docs_src/background_tasks/tutorial001_py310.py hl[6:9] *}
|
||||
|
||||
## 添加后台任务 { #add-the-background-task }
|
||||
|
||||
在你的*路径操作函数*里,用 `.add_task()` 把任务函数加到 `BackgroundTasks` 对象里:
|
||||
在你的 *路径操作函数* 里,用 `.add_task()` 方法将任务函数传到 *后台任务* 对象中:
|
||||
|
||||
{* ../../docs_src/background_tasks/tutorial001_py310.py hl[14] *}
|
||||
|
||||
`.add_task()` 的参数:
|
||||
`.add_task()` 接收以下参数:
|
||||
|
||||
* 要在后台运行的任务函数(`write_notification`)。
|
||||
* 按位置传给任务函数的参数序列(`email`)。
|
||||
* 传给任务函数的关键字参数(`message="some notification"`)。
|
||||
* 在后台运行的任务函数(`write_notification`)。
|
||||
* 应按顺序传递给任务函数的任意参数序列(`email`)。
|
||||
* 应传递给任务函数的任意关键字参数(`message="some notification"`)。
|
||||
|
||||
## 依赖注入 { #dependency-injection }
|
||||
|
||||
配合依赖注入也能用。你可以在多层级声明 `BackgroundTasks` 参数:在*路径操作函数*、依赖、子依赖等。
|
||||
使用 `BackgroundTasks` 也适用于依赖注入系统,你可以在多个级别声明 `BackgroundTasks` 类型的参数:在 *路径操作函数* 里,在依赖中(可依赖),在子依赖中,等等。
|
||||
|
||||
**FastAPI** 会复用同一个对象。把各处添加的后台任务合并。等响应发出后再统一执行:
|
||||
**FastAPI** 知道在每种情况下该做什么以及如何复用同一对象,因此所有后台任务被合并在一起并且随后在后台运行:
|
||||
|
||||
{* ../../docs_src/background_tasks/tutorial002_an_py310.py hl[13,15,22,25] *}
|
||||
|
||||
这个示例里,响应发出后才把消息写进 `log.txt`。
|
||||
该示例中,信息会在响应发出 *之后* 被写到 `log.txt` 文件。
|
||||
|
||||
如果请求里有 query,会由后台任务写入日志。
|
||||
如果请求中有查询,它将在后台任务中写入日志。
|
||||
|
||||
然后路径操作函数里再加一个后台任务。它会用 `email` 路径参数写一条消息。
|
||||
然后另一个在 *路径操作函数* 生成的后台任务会使用路径参数 `email` 写入一条信息。
|
||||
|
||||
## 技术细节 { #technical-details }
|
||||
|
||||
`BackgroundTasks` 类来自 [`starlette.background`](https://www.starlette.dev/background/)。
|
||||
`BackgroundTasks` 类直接来自 [`starlette.background`](https://www.starlette.dev/background/)。
|
||||
|
||||
它在 FastAPI 里被直接导出。这样你可以从 `fastapi` 导入,避免不小心从 `starlette.background` 导入另一个 `BackgroundTask`(没有结尾的 s)。
|
||||
它被直接导入/包含到FastAPI以便你可以从 `fastapi` 导入,并避免意外从 `starlette.background` 导入备用的 `BackgroundTask` (后面没有 `s`)。
|
||||
|
||||
只用 `BackgroundTasks`(不是 `BackgroundTask`)时,就能把它当作*路径操作函数*的参数。剩下的交给 **FastAPI**,跟直接用 `Request` 类似。
|
||||
通过仅使用 `BackgroundTasks` (而不是 `BackgroundTask`),使得能将它作为 *路径操作函数* 的参数 ,并让**FastAPI**为您处理其余部分, 就像直接使用 `Request` 对象。
|
||||
|
||||
当然也能在 FastAPI 里单独用 `BackgroundTask`。但你要自己创建对象,并返回包含它的 Starlette `Response`。
|
||||
在FastAPI中仍然可以单独使用 `BackgroundTask`,但您必须在代码中创建对象,并返回包含它的Starlette `Response`。
|
||||
|
||||
更多细节看 [Starlette 的 Background Tasks 文档](https://www.starlette.dev/background/)。
|
||||
更多细节查看 [Starlette 后台任务的官方文档](https://www.starlette.dev/background/)。
|
||||
|
||||
## 注意事项 { #caveat }
|
||||
## 告诫 { #caveat }
|
||||
|
||||
如果后台计算很重,而且不需要在同一进程里跑(不需要共享内存、变量等),用更大的工具会更好,比如 [Celery](https://docs.celeryq.dev)。
|
||||
如果您需要执行繁重的后台计算,并且不一定需要由同一进程运行(例如,您不需要共享内存、变量等),那么使用其他更大的工具(如 [Celery](https://docs.celeryq.dev))可能更好。
|
||||
|
||||
它们配置更复杂。需要消息/任务队列管理器,比如 RabbitMQ 或 Redis。好处是能在多个进程,尤其是多台服务器上跑后台任务。
|
||||
它们往往需要更复杂的配置,即消息/作业队列管理器,如RabbitMQ或Redis,但它们允许您在多个进程中运行后台任务,甚至是在多个服务器中。
|
||||
|
||||
但如果你要访问同一个 **FastAPI** 应用里的变量和对象。或者任务很轻(比如发邮件通知)。用 `BackgroundTasks` 就够了。
|
||||
但是,如果您需要从同一个**FastAPI**应用程序访问变量和对象,或者您需要执行小型后台任务(如发送电子邮件通知),您只需使用 `BackgroundTasks` 即可。
|
||||
|
||||
## 回顾 { #recap }
|
||||
|
||||
在*路径操作函数*和依赖里导入并使用 `BackgroundTasks` 参数,给应用添加后台任务。
|
||||
导入并使用 `BackgroundTasks` 通过 *路径操作函数* 中的参数和依赖项来添加后台任务。
|
||||
|
||||
@@ -1,24 +1,24 @@
|
||||
# Body - 多个参数 { #body-multiple-parameters }
|
||||
# 请求体 - 多个参数 { #body-multiple-parameters }
|
||||
|
||||
前面看了 `Path` 和 `Query`。现在来看更高级的请求体声明用法。
|
||||
既然我们已经知道了如何使用 `Path` 和 `Query`,下面让我们来了解一下请求体声明的更高级用法。
|
||||
|
||||
## 混用 `Path`、`Query` 和请求体参数 { #mix-path-query-and-body-parameters }
|
||||
## 混合使用 `Path`、`Query` 和请求体参数 { #mix-path-query-and-body-parameters }
|
||||
|
||||
先说结论。`Path`、`Query` 和请求体参数可以随意混用。**FastAPI** 会自己分辨。
|
||||
首先,毫无疑问地,你可以随意地混合使用 `Path`、`Query` 和请求体参数声明,**FastAPI** 会知道该如何处理。
|
||||
|
||||
Body 参数也能是可选的。把默认值设为 `None` 就行:
|
||||
你还可以通过将默认值设置为 `None` 来将请求体参数声明为可选参数:
|
||||
|
||||
{* ../../docs_src/body_multiple_params/tutorial001_an_py310.py hl[18:20] *}
|
||||
|
||||
/// note | 注意
|
||||
|
||||
注意,这里从请求体取出的 `item` 是可选的。因为它的默认值是 `None`。
|
||||
请注意,在这种情况下,将从请求体获取的 `item` 是可选的。因为它的默认值为 `None`。
|
||||
|
||||
///
|
||||
|
||||
## 多个请求体参数 { #multiple-body-parameters }
|
||||
|
||||
上个例子里,*路径操作* 期望收到一个包含 `Item` 属性的 JSON:
|
||||
在上面的示例中,*路径操作*将期望一个具有 `Item` 的属性的 JSON 请求体,就像:
|
||||
|
||||
```JSON
|
||||
{
|
||||
@@ -29,13 +29,13 @@ Body 参数也能是可选的。把默认值设为 `None` 就行:
|
||||
}
|
||||
```
|
||||
|
||||
也可以声明多个请求体参数,比如 `item` 和 `user`:
|
||||
但是你也可以声明多个请求体参数,例如 `item` 和 `user`:
|
||||
|
||||
{* ../../docs_src/body_multiple_params/tutorial002_py310.py hl[20] *}
|
||||
|
||||
这时函数里有不止一个请求体参数(两个都是 Pydantic 模型)。**FastAPI** 会识别出来。
|
||||
在这种情况下,**FastAPI** 将注意到该函数中有多个请求体参数(两个 Pydantic 模型参数)。
|
||||
|
||||
它会用参数名作为请求体里的键(字段名)。期望的请求体长这样:
|
||||
因此,它将使用参数名称作为请求体中的键(字段名称),并期望一个类似于以下内容的请求体:
|
||||
|
||||
```JSON
|
||||
{
|
||||
@@ -54,27 +54,27 @@ Body 参数也能是可选的。把默认值设为 `None` 就行:
|
||||
|
||||
/// note | 注意
|
||||
|
||||
注意,`item` 的声明和之前一样。现在它需要包在请求体的 `item` 键里。
|
||||
请注意,即使 `item` 的声明方式与之前相同,但现在它被期望通过 `item` 键内嵌在请求体中。
|
||||
|
||||
///
|
||||
|
||||
**FastAPI** 会把请求自动转换。`item` 和 `user` 各拿到各自的内容。
|
||||
**FastAPI** 将自动对请求中的数据进行转换,因此 `item` 参数将接收指定的内容,`user` 参数也是如此。
|
||||
|
||||
它会校验组合数据。还会按这个结构生成 OpenAPI 模式和自动文档。
|
||||
它将执行对复合数据的校验,并且像现在这样为 OpenAPI 模式和自动化文档对其进行记录。
|
||||
|
||||
## 请求体里的单个值 { #singular-values-in-body }
|
||||
## 请求体中的单一值 { #singular-values-in-body }
|
||||
|
||||
就像有 `Query`、`Path` 用来给查询参数和路径参数加额外信息。**FastAPI** 也提供了等价的 `Body`。
|
||||
与使用 `Query` 和 `Path` 为查询参数和路径参数定义额外数据的方式相同,**FastAPI** 提供了一个同等的 `Body`。
|
||||
|
||||
比如,在上面的模型上再加一个同级的键 `importance`,和 `item`、`user` 并列。
|
||||
例如,为了扩展先前的模型,你可能决定除了 `item` 和 `user` 之外,还想在同一请求体中具有另一个键 `importance`。
|
||||
|
||||
如果直接这么声明。因为它是单个值,**FastAPI** 会把它当成查询参数。
|
||||
如果你就按原样声明它,因为它是一个单一值,**FastAPI** 将假定它是一个查询参数。
|
||||
|
||||
但你可以用 `Body` 告诉 **FastAPI** 把它当成请求体里的另一个键:
|
||||
但是你可以使用 `Body` 指示 **FastAPI** 将其作为请求体的另一个键进行处理。
|
||||
|
||||
{* ../../docs_src/body_multiple_params/tutorial003_an_py310.py hl[23] *}
|
||||
|
||||
这时,**FastAPI** 期望的请求体是:
|
||||
在这种情况下,**FastAPI** 将期望像这样的请求体:
|
||||
|
||||
```JSON
|
||||
{
|
||||
@@ -92,45 +92,45 @@ Body 参数也能是可选的。把默认值设为 `None` 就行:
|
||||
}
|
||||
```
|
||||
|
||||
同样会做类型转换、校验和文档生成。
|
||||
同样的,它将转换数据类型,校验,生成文档等。
|
||||
|
||||
## 多个请求体参数配合查询参数 { #multiple-body-params-and-query }
|
||||
## 多个请求体参数和查询参数 { #multiple-body-params-and-query }
|
||||
|
||||
当然,也可以在有请求体参数时再加查询参数。
|
||||
当然,除了请求体参数外,你还可以在任何需要的时候声明额外的查询参数。
|
||||
|
||||
默认单个值会被当成查询参数。你不必显式用 `Query`,直接写:
|
||||
由于默认情况下单一值会被解释为查询参数,因此你不必显式地添加 `Query`,你可以这样写:
|
||||
|
||||
```Python
|
||||
q: str | None = None
|
||||
```
|
||||
|
||||
例如:
|
||||
比如:
|
||||
|
||||
{* ../../docs_src/body_multiple_params/tutorial004_an_py310.py hl[28] *}
|
||||
|
||||
/// note | 注意
|
||||
/// info | 信息
|
||||
|
||||
`Body` 也支持和 `Query`、`Path` 一样的额外校验和元数据参数。后面会用到。
|
||||
`Body` 同样具有与 `Query`、`Path` 以及其他后面将看到的类完全相同的额外校验和元数据参数。
|
||||
|
||||
///
|
||||
|
||||
## 嵌套单个请求体参数 { #embed-a-single-body-parameter }
|
||||
## 嵌入单个请求体参数 { #embed-a-single-body-parameter }
|
||||
|
||||
假设你只有一个 Pydantic 模型 `Item` 的 `item` 请求体参数。
|
||||
假设你只有一个来自 Pydantic 模型 `Item` 的请求体参数 `item`。
|
||||
|
||||
默认会直接期望模型本身作为请求体。
|
||||
默认情况下,**FastAPI** 将直接期望这样的请求体。
|
||||
|
||||
但如果你想让它期望一个带 `item` 键的 JSON。模型内容放在这个键里。就像有额外请求体参数时那样。可以用 `Body` 的特殊参数 `embed`:
|
||||
但是,如果你希望它期望一个拥有 `item` 键并在值中包含模型内容的 JSON,就像在声明额外的请求体参数时所做的那样,则可以使用一个特殊的 `Body` 参数 `embed`:
|
||||
|
||||
```Python
|
||||
item: Annotated[Item, Body(embed=True)]
|
||||
item: Item = Body(embed=True)
|
||||
```
|
||||
|
||||
例如:
|
||||
比如:
|
||||
|
||||
{* ../../docs_src/body_multiple_params/tutorial005_an_py310.py hl[17] *}
|
||||
|
||||
这时 **FastAPI** 期望的请求体是:
|
||||
在这种情况下,**FastAPI** 将期望像这样的请求体:
|
||||
|
||||
```JSON hl_lines="2"
|
||||
{
|
||||
@@ -154,12 +154,12 @@ item: Annotated[Item, Body(embed=True)]
|
||||
}
|
||||
```
|
||||
|
||||
## 小结 { #recap }
|
||||
## 总结 { #recap }
|
||||
|
||||
即使一个请求只有一个请求体。你也能在路径操作函数里声明多个请求体参数。
|
||||
你可以添加多个请求体参数到*路径操作函数*中,即使一个请求只能有一个请求体。
|
||||
|
||||
**FastAPI** 会处理好这些映射。把正确的数据传给函数。并校验并在路径操作里生成正确的模式文档。
|
||||
但是 **FastAPI** 会处理它,在函数中为你提供正确的数据,并在*路径操作*中校验并记录正确的模式。
|
||||
|
||||
你也能把单个值声明为请求体的一部分。
|
||||
你还可以声明将作为请求体的一部分所接收的单一值。
|
||||
|
||||
只有一个参数时。也可以让 **FastAPI** 把它嵌在某个键里。
|
||||
你还可以指示 **FastAPI** 在仅声明了一个请求体参数的情况下,将原本的请求体嵌入到一个键中。
|
||||
|
||||
@@ -1,40 +1,40 @@
|
||||
# 请求体 { #request-body }
|
||||
|
||||
需要从客户端(比如浏览器)往 API 发送数据时,用请求体发。
|
||||
当你需要从客户端(比如浏览器)向你的 API 发送数据时,会把它作为**请求体**发送。
|
||||
|
||||
请求体是客户端发给 API 的数据。响应体是 API 回给客户端的数据。
|
||||
**请求体**是客户端发送给你的 API 的数据。**响应体**是你的 API 发送给客户端的数据。
|
||||
|
||||
API 几乎总要发响应体。客户端不一定总要发请求体。有时只请求一个路径,加点查询参数,不带 body。
|
||||
你的 API 几乎总是需要发送**响应体**。但客户端不一定总是要发送**请求体**,有时它们只请求某个路径,可能带一些查询参数,但不会发送请求体。
|
||||
|
||||
要声明请求体,用 [Pydantic](https://docs.pydantic.dev/) 的模型。功能全,还好用。
|
||||
使用 [Pydantic](https://docs.pydantic.dev/) 模型来声明**请求体**,能充分利用它的功能和优点。
|
||||
|
||||
/// note | 注意
|
||||
/// info | 信息
|
||||
|
||||
发数据应该用这些方法之一:`POST`(更常见)、`PUT`、`DELETE`、`PATCH`。
|
||||
发送数据应使用以下之一:`POST`(最常见)、`PUT`、`DELETE` 或 `PATCH`。
|
||||
|
||||
规范里,对 `GET` 携带 body 没有定义的行为。FastAPI 也支持,但只用于非常复杂/极端的场景。
|
||||
规范中没有定义用 `GET` 请求发送请求体的行为,但 FastAPI 仍支持这种方式,只用于非常复杂/极端的用例。
|
||||
|
||||
因为不推荐,Swagger UI 的交互文档在 `GET` 时不会展示 body。中间的代理也可能不支持。
|
||||
由于不推荐,在使用 `GET` 时,Swagger UI 的交互式文档不会显示请求体的文档,而且中间的代理可能也不支持它。
|
||||
|
||||
///
|
||||
|
||||
## 导入 Pydantic 的 `BaseModel` { #import-pydantics-basemodel }
|
||||
|
||||
先从 `pydantic` 导入 `BaseModel`:
|
||||
从 `pydantic` 中导入 `BaseModel`:
|
||||
|
||||
{* ../../docs_src/body/tutorial001_py310.py hl[2] *}
|
||||
|
||||
## 创建数据模型 { #create-your-data-model }
|
||||
|
||||
然后写一个继承 `BaseModel` 的类,作为数据模型。
|
||||
把数据模型声明为继承 `BaseModel` 的类。
|
||||
|
||||
所有属性都用标准的 Python 类型:
|
||||
使用 Python 标准类型声明所有属性:
|
||||
|
||||
{* ../../docs_src/body/tutorial001_py310.py hl[5:9] *}
|
||||
|
||||
跟声明查询参数一样。模型属性有默认值就不是必填。没有默认值就是必填。设成 `None` 表示可选。
|
||||
与声明查询参数一样,包含默认值的模型属性是可选的,否则就是必选的。把默认值设为 `None` 可使其变为可选。
|
||||
|
||||
比如,上面的模型对应的 JSON "`object`"(或 Python `dict`)长这样:
|
||||
例如,上述模型声明如下 JSON "object"(即 Python `dict`):
|
||||
|
||||
```JSON
|
||||
{
|
||||
@@ -45,7 +45,7 @@ API 几乎总要发响应体。客户端不一定总要发请求体。有时只
|
||||
}
|
||||
```
|
||||
|
||||
...因为 `description` 和 `tax` 是可选的(默认 `None`),这个 JSON "`object`" 也合法:
|
||||
...由于 `description` 和 `tax` 是可选的(默认值为 `None`),下面的 JSON "object" 也有效:
|
||||
|
||||
```JSON
|
||||
{
|
||||
@@ -54,74 +54,76 @@ API 几乎总要发响应体。客户端不一定总要发请求体。有时只
|
||||
}
|
||||
```
|
||||
|
||||
## 把它声明成参数 { #declare-it-as-a-parameter }
|
||||
## 声明为参数 { #declare-it-as-a-parameter }
|
||||
|
||||
要把它加到路径操作里,和声明路径参数、查询参数的方式一样:
|
||||
使用与声明路径和查询参数相同的方式,把它添加至*路径操作*:
|
||||
|
||||
{* ../../docs_src/body/tutorial001_py310.py hl[16] *}
|
||||
|
||||
把它的类型写成你创建的模型,`Item`。
|
||||
...并把其类型声明为你创建的模型 `Item`。
|
||||
|
||||
## 效果 { #results }
|
||||
## 结果 { #results }
|
||||
|
||||
只靠这个 Python 类型声明,FastAPI 会:
|
||||
仅使用这些 Python 类型声明,**FastAPI** 就可以:
|
||||
|
||||
* 把请求体按 JSON 读取。
|
||||
* 按需做类型转换。
|
||||
* 以 JSON 形式读取请求体。
|
||||
* (在必要时)把请求体转换为对应的类型。
|
||||
* 校验数据。
|
||||
* 如果数据不合法,会返回清晰的错误。说明哪儿错了,错了什么。
|
||||
* 把收到的数据放在参数 `item` 里给你。
|
||||
* 参数类型是 `Item`。编辑器会给你补全等支持,包括属性和它们的类型。
|
||||
* 为你的模型生成 [JSON Schema](https://json-schema.org) 定义。你也可以在项目里其它地方复用它们。
|
||||
* 这些 Schema 会进到生成的 OpenAPI 里。自动文档 <abbr title="User Interfaces - 用户界面">UIs</abbr> 会用到它们。
|
||||
* 数据无效时返回清晰的错误信息,并指出错误数据的确切位置和内容。
|
||||
* 把接收的数据赋值给参数 `item`。
|
||||
* 因为你把函数中的参数类型声明为 `Item`,所以还能获得所有属性及其类型的编辑器支持(补全等)。
|
||||
* 为你的模型生成 [JSON Schema](https://json-schema.org) 定义,如果对你的项目有意义,还可以在其他地方使用它们。
|
||||
* 这些 schema 会成为生成的 OpenAPI Schema 的一部分,并被自动文档的 <abbr title="User Interfaces - 用户界面">UIs</abbr> 使用。
|
||||
|
||||
## 自动文档 { #automatic-docs }
|
||||
|
||||
模型的 JSON Schema 会包含在生成的 OpenAPI 里。会显示在交互式 API 文档里:
|
||||
你的模型的 JSON Schema 会成为生成的 OpenAPI Schema 的一部分,并显示在交互式 API 文档中:
|
||||
|
||||
<img src="/img/tutorial/body/image01.png">
|
||||
|
||||
需要它们的每个路径操作的文档里也会用到:
|
||||
并且,还会用于需要它们的每个*路径操作*的 API 文档中:
|
||||
|
||||
<img src="/img/tutorial/body/image02.png">
|
||||
|
||||
## 编辑器支持 { #editor-support }
|
||||
|
||||
在编辑器里,函数内到处都有类型提示和补全。(如果收的是 `dict` 而不是 Pydantic 模型,就没有这些。)
|
||||
在编辑器中,函数内部你会在各处得到类型提示与补全(如果接收的不是 Pydantic 模型,而是 `dict`,就不会有这样的支持):
|
||||
|
||||
还会检查错误的类型操作:
|
||||
<img src="/img/tutorial/body/image03.png">
|
||||
|
||||
还支持检查错误的类型操作:
|
||||
|
||||
<img src="/img/tutorial/body/image04.png">
|
||||
|
||||
这不是巧合,整个框架就是这么设计的。
|
||||
这并非偶然,整个框架都是围绕这种设计构建的。
|
||||
|
||||
在实现前的设计阶段就充分测试过。确保能和各类编辑器配合。
|
||||
并且在设计阶段、实现之前就进行了全面测试,以确保它能在所有编辑器中正常工作。
|
||||
|
||||
为此甚至改过 Pydantic。
|
||||
我们甚至对 Pydantic 本身做了一些改动以支持这些功能。
|
||||
|
||||
上面的截图用的是 [Visual Studio Code](https://code.visualstudio.com)。
|
||||
上面的截图来自 [Visual Studio Code](https://code.visualstudio.com)。
|
||||
|
||||
用 [PyCharm](https://www.jetbrains.com/pycharm/) 和大多数 Python 编辑器也一样:
|
||||
但使用 [PyCharm](https://www.jetbrains.com/pycharm/) 和大多数其他 Python 编辑器,你也会获得相同的编辑器支持:
|
||||
|
||||
<img src="/img/tutorial/body/image05.png">
|
||||
|
||||
/// tip | 提示
|
||||
|
||||
如果用 [PyCharm](https://www.jetbrains.com/pycharm/),可以装 [Pydantic PyCharm Plugin](https://github.com/koxudaxi/pydantic-pycharm-plugin/)。
|
||||
如果你使用 [PyCharm](https://www.jetbrains.com/pycharm/) 作为编辑器,可以使用 [Pydantic PyCharm 插件](https://github.com/koxudaxi/pydantic-pycharm-plugin/)。
|
||||
|
||||
它能增强 Pydantic 模型的编辑器支持:
|
||||
它能改进对 Pydantic 模型的编辑器支持,包括:
|
||||
|
||||
* 自动补全
|
||||
* 类型检查
|
||||
* 重构
|
||||
* 搜索
|
||||
* 检查
|
||||
* 代码重构
|
||||
* 查找
|
||||
* 代码审查
|
||||
|
||||
///
|
||||
|
||||
## 使用模型 { #use-the-model }
|
||||
|
||||
在函数里可以直接访问模型对象的所有属性:
|
||||
在*路径操作*函数内部直接访问模型对象的所有属性:
|
||||
|
||||
{* ../../docs_src/body/tutorial002_py310.py *}
|
||||
|
||||
@@ -129,34 +131,34 @@ API 几乎总要发响应体。客户端不一定总要发请求体。有时只
|
||||
|
||||
可以同时声明路径参数和请求体。
|
||||
|
||||
FastAPI 会识别:和路径参数同名的函数参数来自路径。声明为 Pydantic 模型的函数参数来自请求体。
|
||||
**FastAPI** 能识别与**路径参数**匹配的函数参数应该**从路径中获取**,而声明为 Pydantic 模型的函数参数应该**从请求体中获取**。
|
||||
|
||||
{* ../../docs_src/body/tutorial003_py310.py hl[15:16] *}
|
||||
|
||||
## 请求体 + 路径 + 查询参数 { #request-body-path-query-parameters }
|
||||
|
||||
也可以同时声明 body、path、query 参数。
|
||||
也可以同时声明**请求体**、**路径**和**查询**参数。
|
||||
|
||||
FastAPI 会识别它们,并从对应位置取数据。
|
||||
**FastAPI** 会分别识别它们,并从正确的位置获取数据。
|
||||
|
||||
{* ../../docs_src/body/tutorial004_py310.py hl[16] *}
|
||||
|
||||
函数参数的识别规则:
|
||||
函数参数按如下规则进行识别:
|
||||
|
||||
* 参数在路径里也声明了 → 当作路径参数。
|
||||
* 参数是“标量类型”(如 `int`、`float`、`str`、`bool` 等)→ 当作查询参数。
|
||||
* 参数类型是 Pydantic 模型 → 当作请求体。
|
||||
* 如果该参数也在**路径**中声明了,它就是路径参数。
|
||||
* 如果该参数是(`int`、`float`、`str`、`bool` 等)**单一类型**,它会被当作**查询**参数。
|
||||
* 如果该参数的类型声明为 **Pydantic 模型**,它会被当作请求**体**。
|
||||
|
||||
/// note | 注意
|
||||
|
||||
因为默认值是 `= None`,FastAPI 知道 `q` 不是必填。
|
||||
FastAPI 会根据默认值 `= None` 知道 `q` 的值不是必填的。
|
||||
|
||||
FastAPI 不靠 `str | None` 来判断是否必填。它看默认值 `= None`。
|
||||
`str | None` 并不是 FastAPI 用来判断是否必填的依据;是否必填由是否有默认值 `= None` 决定。
|
||||
|
||||
但加上类型标注,编辑器能提供更好的支持并发现错误。
|
||||
但添加这些类型注解可以让你的编辑器提供更好的支持并检测错误。
|
||||
|
||||
///
|
||||
|
||||
## 不用 Pydantic { #without-pydantic }
|
||||
## 不使用 Pydantic { #without-pydantic }
|
||||
|
||||
如果不想用 Pydantic 模型,也可以用 Body 参数。看这篇文档:[Body - 多个参数:请求体里的标量值](body-multiple-params.md#singular-values-in-body)。
|
||||
即便不使用 Pydantic 模型也能使用 **Body** 参数。详见[请求体 - 多参数:请求体中的单值](body-multiple-params.md#singular-values-in-body)。
|
||||
|
||||
@@ -1,12 +1,12 @@
|
||||
# 第一步 { #first-steps }
|
||||
|
||||
最简单的 FastAPI 文件长这样:
|
||||
最简单的 FastAPI 文件可能像下面这样:
|
||||
|
||||
{* ../../docs_src/first_steps/tutorial001_py310.py *}
|
||||
|
||||
复制到 `main.py` 里。
|
||||
将其复制到 `main.py` 文件中。
|
||||
|
||||
运行开发服务器:
|
||||
运行实时服务器:
|
||||
|
||||
<div class="termy">
|
||||
|
||||
@@ -48,19 +48,19 @@ $ <font color="#4E9A06">fastapi</font> dev
|
||||
|
||||
</div>
|
||||
|
||||
输出里有一行像这样:
|
||||
在输出中,会有一行信息像下面这样:
|
||||
|
||||
```hl_lines="4"
|
||||
INFO: Uvicorn running on http://127.0.0.1:8000 (Press CTRL+C to quit)
|
||||
```
|
||||
|
||||
这行告诉你本机服务的地址。
|
||||
该行显示了你的应用在本机所提供服务的 URL 地址。
|
||||
|
||||
### 试一下 { #check-it }
|
||||
### 查看 { #check-it }
|
||||
|
||||
打开浏览器访问 [http://127.0.0.1:8000](http://127.0.0.1:8000)。
|
||||
|
||||
会看到这个 JSON 响应:
|
||||
你将看到如下的 JSON 响应:
|
||||
|
||||
```JSON
|
||||
{"message": "Hello World"}
|
||||
@@ -68,51 +68,51 @@ INFO: Uvicorn running on http://127.0.0.1:8000 (Press CTRL+C to quit)
|
||||
|
||||
### 交互式 API 文档 { #interactive-api-docs }
|
||||
|
||||
现在打开 [http://127.0.0.1:8000/docs](http://127.0.0.1:8000/docs)。
|
||||
跳转到 [http://127.0.0.1:8000/docs](http://127.0.0.1:8000/docs)。
|
||||
|
||||
你会看到自动生成的交互式 API 文档(由 [Swagger UI](https://github.com/swagger-api/swagger-ui) 提供):
|
||||
你将会看到自动生成的交互式 API 文档(由 [Swagger UI](https://github.com/swagger-api/swagger-ui) 提供):
|
||||
|
||||

|
||||
|
||||
### 另一个 API 文档 { #alternative-api-docs }
|
||||
### 可选的 API 文档 { #alternative-api-docs }
|
||||
|
||||
然后访问 [http://127.0.0.1:8000/redoc](http://127.0.0.1:8000/redoc)。
|
||||
前往 [http://127.0.0.1:8000/redoc](http://127.0.0.1:8000/redoc)。
|
||||
|
||||
你会看到另一个自动文档(由 [ReDoc](https://github.com/Rebilly/ReDoc) 提供):
|
||||
你将会看到可选的自动生成文档 (由 [ReDoc](https://github.com/Rebilly/ReDoc) 提供):
|
||||
|
||||

|
||||
|
||||
### OpenAPI { #openapi }
|
||||
|
||||
FastAPI 会用 OpenAPI 标准为你的 API 生成一个“schema”(模式)。
|
||||
**FastAPI** 使用定义 API 的 **OpenAPI** 标准将你的所有 API 转换成「模式」。
|
||||
|
||||
#### “Schema” { #schema }
|
||||
#### 「模式」 { #schema }
|
||||
|
||||
“schema” 是某个东西的定义或描述。不是实现它的代码。只是抽象描述。
|
||||
「模式」是对事物的一种定义或描述。它并非具体的实现代码,而只是抽象的描述。
|
||||
|
||||
#### API 的 “schema” { #api-schema }
|
||||
#### API「模式」 { #api-schema }
|
||||
|
||||
这里的 [OpenAPI](https://github.com/OAI/OpenAPI-Specification) 是一个规范。它规定怎么定义你的 API 的 schema。
|
||||
在这种场景下,[OpenAPI](https://github.com/OAI/OpenAPI-Specification) 是一种规定如何定义 API 模式的规范。
|
||||
|
||||
这个 schema 会包含你的 API 的路径、可用的参数等。
|
||||
「模式」的定义包括你的 API 路径,以及它们可能使用的参数等等。
|
||||
|
||||
#### 数据的 “schema” { #data-schema }
|
||||
#### 数据「模式」 { #data-schema }
|
||||
|
||||
“schema” 也可以指数据的结构,比如 JSON 内容。
|
||||
「模式」这个术语也可能指的是某些数据比如 JSON 的结构。
|
||||
|
||||
这时指的是 JSON 的属性、它们的数据类型等。
|
||||
在这种情况下,它可以表示 JSON 的属性及其具有的数据类型,等等。
|
||||
|
||||
#### OpenAPI 和 JSON Schema { #openapi-and-json-schema }
|
||||
|
||||
OpenAPI 定义你的 API 的 schema。这个 schema 里包含数据的定义(也叫 “schemas”)。这些数据是 API 发送和接收的,使用 JSON Schema 这个 JSON 数据模式的标准。
|
||||
OpenAPI 为你的 API 定义 API 模式。该模式中包含了你的 API 发送和接收的数据的定义(或称为「模式」),这些定义通过 JSON 数据模式标准 **JSON Schema** 所生成。
|
||||
|
||||
#### 看看 `openapi.json` { #check-the-openapi-json }
|
||||
#### 查看 `openapi.json` { #check-the-openapi-json }
|
||||
|
||||
想看原始的 OpenAPI schema 怎么样?FastAPI 会自动生成一个包含所有 API 描述的 JSON(schema)。
|
||||
如果你对原始的 OpenAPI 模式长什么样子感到好奇,FastAPI 自动生成了包含所有 API 描述的 JSON(模式)。
|
||||
|
||||
直接打开:[http://127.0.0.1:8000/openapi.json](http://127.0.0.1:8000/openapi.json)。
|
||||
你可以直接在:[http://127.0.0.1:8000/openapi.json](http://127.0.0.1:8000/openapi.json) 看到它。
|
||||
|
||||
你会看到一个 JSON,开头像这样:
|
||||
它将显示以如下内容开头的 JSON:
|
||||
|
||||
```JSON
|
||||
{
|
||||
@@ -135,30 +135,30 @@ OpenAPI 定义你的 API 的 schema。这个 schema 里包含数据的定义(
|
||||
...
|
||||
```
|
||||
|
||||
#### OpenAPI 有什么用 { #what-is-openapi-for }
|
||||
#### OpenAPI 的用途 { #what-is-openapi-for }
|
||||
|
||||
这份 OpenAPI schema 驱动了上面两个交互式文档。
|
||||
驱动 FastAPI 内置的 2 个交互式文档系统的正是 OpenAPI 模式。
|
||||
|
||||
还有很多基于 OpenAPI 的替代方案。你可以很容易把它们加到用 FastAPI 构建的应用里。
|
||||
并且还有数十种替代方案,它们全部都基于 OpenAPI。你可以轻松地将这些替代方案中的任何一种添加到使用 **FastAPI** 构建的应用程序中。
|
||||
|
||||
你也可以用它自动生成客户端代码。比如前端、移动端或 IoT 应用。
|
||||
你还可以使用它自动生成与你的 API 进行通信的客户端代码。例如 web 前端,移动端或物联网嵌入程序。
|
||||
|
||||
### 在 `pyproject.toml` 里配置应用的 `entrypoint` { #configure-the-app-entrypoint-in-pyproject-toml }
|
||||
### 在 `pyproject.toml` 中配置应用 `entrypoint` { #configure-the-app-entrypoint-in-pyproject-toml }
|
||||
|
||||
你可以在 `pyproject.toml` 里配置应用的位置,像这样:
|
||||
你可以在 `pyproject.toml` 文件中配置应用的位置,例如:
|
||||
|
||||
```toml
|
||||
[tool.fastapi]
|
||||
entrypoint = "main:app"
|
||||
```
|
||||
|
||||
这个 `entrypoint` 会告诉 `fastapi` 命令按下面方式 import 应用:
|
||||
该 `entrypoint` 会告诉 `fastapi` 命令按如下方式导入应用:
|
||||
|
||||
```python
|
||||
from main import app
|
||||
```
|
||||
|
||||
如果你的代码结构是这样:
|
||||
如果你的代码结构如下:
|
||||
|
||||
```
|
||||
.
|
||||
@@ -167,44 +167,38 @@ from main import app
|
||||
│ ├── __init__.py
|
||||
```
|
||||
|
||||
那就把 `entrypoint` 设成:
|
||||
那么你可以将 `entrypoint` 设置为:
|
||||
|
||||
```toml
|
||||
[tool.fastapi]
|
||||
entrypoint = "backend.main:app"
|
||||
```
|
||||
|
||||
等价于:
|
||||
这等价于:
|
||||
|
||||
```python
|
||||
from backend.main import app
|
||||
```
|
||||
|
||||
### `fastapi dev` 传文件路径或用 `--entrypoint` 选项 { #fastapi-dev-with-path-or-with-entrypoint-cli-option }
|
||||
### `fastapi dev` 带路径 { #fastapi-dev-with-path }
|
||||
|
||||
也可以把文件路径传给 `fastapi dev`。它会猜要用的 FastAPI app 对象:
|
||||
你也可以把文件路径传给 `fastapi dev` 命令,它会尝试推断要使用的 FastAPI 应用对象:
|
||||
|
||||
```console
|
||||
$ fastapi dev main.py
|
||||
```
|
||||
|
||||
或者给 `fastapi dev` 传 `--entrypoint` 选项:
|
||||
但这样每次调用 `fastapi` 命令时都需要记得传入正确的路径。
|
||||
|
||||
```console
|
||||
$ fastapi dev --entrypoint main:app
|
||||
```
|
||||
另外,其他工具可能无法找到它,例如 [VS Code 扩展](../editor-support.md) 或 [FastAPI Cloud](https://fastapicloud.com),因此推荐在 `pyproject.toml` 中使用 `entrypoint`。
|
||||
|
||||
但每次跑 `fastapi` 都得记得传对的路径或 entrypoint。
|
||||
### 部署你的应用(可选) { #deploy-your-app-optional }
|
||||
|
||||
而且其它工具可能找不到它。比如 [VS Code 扩展](../editor-support.md) 或 [FastAPI Cloud](https://fastapicloud.com)。所以推荐在 `pyproject.toml` 里配置 `entrypoint`。
|
||||
你可以选择将 FastAPI 应用部署到 [FastAPI Cloud](https://fastapicloud.com),如果还没有,先去加入候补名单。🚀
|
||||
|
||||
### 部署应用(可选) { #deploy-your-app-optional }
|
||||
如果你已经拥有 **FastAPI Cloud** 账户(我们从候补名单邀请了你 😉),你可以用一条命令部署应用。
|
||||
|
||||
你也可以把 FastAPI 应用部署到 [FastAPI Cloud](https://fastapicloud.com)。还没账号的话去加入候补名单。🚀
|
||||
|
||||
如果你已经有 **FastAPI Cloud** 账号(我们从候补名单邀请你了 😉),一条命令就能部署。
|
||||
|
||||
部署前,先登录:
|
||||
部署前,先确保已登录:
|
||||
|
||||
<div class="termy">
|
||||
|
||||
@@ -216,7 +210,7 @@ You are logged in to FastAPI Cloud 🚀
|
||||
|
||||
</div>
|
||||
|
||||
然后部署应用:
|
||||
然后部署你的应用:
|
||||
|
||||
<div class="termy">
|
||||
|
||||
@@ -232,166 +226,166 @@ Deploying to FastAPI Cloud...
|
||||
|
||||
</div>
|
||||
|
||||
就这样!现在可以用这个地址访问你的应用了。✨
|
||||
就这些!现在你可以通过该 URL 访问你的应用了。✨
|
||||
|
||||
## 逐步回顾 { #recap-step-by-step }
|
||||
## 分步概括 { #recap-step-by-step }
|
||||
|
||||
### 步骤 1:导入 `FastAPI` { #step-1-import-fastapi }
|
||||
|
||||
{* ../../docs_src/first_steps/tutorial001_py310.py hl[1] *}
|
||||
|
||||
`FastAPI` 是个 Python 类。它提供你的 API 所需的一切功能。
|
||||
`FastAPI` 是一个为你的 API 提供了所有功能的 Python 类。
|
||||
|
||||
/// note | 技术细节
|
||||
|
||||
`FastAPI` 直接继承自 `Starlette`。
|
||||
`FastAPI` 是直接从 `Starlette` 继承的类。
|
||||
|
||||
在 `FastAPI` 里也能用所有的 [Starlette](https://www.starlette.dev/) 功能。
|
||||
你可以通过 `FastAPI` 使用所有的 [Starlette](https://www.starlette.dev/) 的功能。
|
||||
|
||||
///
|
||||
|
||||
### 步骤 2:创建一个 `FastAPI` “实例” { #step-2-create-a-fastapi-instance }
|
||||
### 步骤 2:创建一个 `FastAPI`「实例」 { #step-2-create-a-fastapi-instance }
|
||||
|
||||
{* ../../docs_src/first_steps/tutorial001_py310.py hl[3] *}
|
||||
|
||||
这里的 `app` 变量就是 `FastAPI` 类的一个“实例”。
|
||||
这里的变量 `app` 会是 `FastAPI` 类的一个「实例」。
|
||||
|
||||
你用它来声明整个 API。
|
||||
这个实例将是创建你所有 API 的主要交互对象。
|
||||
|
||||
### 步骤 3:创建一个路径操作 { #step-3-create-a-path-operation }
|
||||
### 步骤 3:创建一个*路径操作* { #step-3-create-a-path-operation }
|
||||
|
||||
#### 路径 { #path }
|
||||
|
||||
这里的 “Path” 指从第一个 `/` 开始的 URL 最后一段。
|
||||
这里的「路径」指的是 URL 中从第一个 `/` 起的后半部分。
|
||||
|
||||
比如这个 URL:
|
||||
所以,在一个这样的 URL 中:
|
||||
|
||||
```
|
||||
https://example.com/items/foo
|
||||
```
|
||||
|
||||
...它的路径是:
|
||||
...路径会是:
|
||||
|
||||
```
|
||||
/items/foo
|
||||
```
|
||||
|
||||
/// note | 注意
|
||||
/// info
|
||||
|
||||
“path” 也常被叫做 “endpoint” 或 “route”。
|
||||
「路径」也通常被称为「端点」或「路由」。
|
||||
|
||||
///
|
||||
|
||||
做 API 时,path 是区分不同“职责”和“资源”的主要方式。
|
||||
开发 API 时,「路径」是用来分离「关注点」和「资源」的主要手段。
|
||||
|
||||
#### 操作 { #operation }
|
||||
|
||||
这里的 “Operation” 指一种 HTTP “方法”。
|
||||
这里的「操作」指的是一种 HTTP「方法」。
|
||||
|
||||
比如:
|
||||
下列之一:
|
||||
|
||||
* `POST`
|
||||
* `GET`
|
||||
* `PUT`
|
||||
* `DELETE`
|
||||
|
||||
...还有更少用的:
|
||||
...以及更少见的几种:
|
||||
|
||||
* `OPTIONS`
|
||||
* `HEAD`
|
||||
* `PATCH`
|
||||
* `TRACE`
|
||||
|
||||
在 HTTP 里,你可以用这些“方法”跟每个路径通信。
|
||||
在 HTTP 协议中,你可以使用以上的其中一种(或多种)「方法」与每个路径进行通信。
|
||||
|
||||
---
|
||||
|
||||
写 API 时,通常用这些方法表示动作。
|
||||
在开发 API 时,你通常使用特定的 HTTP 方法去执行特定的行为。
|
||||
|
||||
一般约定:
|
||||
通常使用:
|
||||
|
||||
* `POST`:创建数据。
|
||||
* `GET`:读取数据。
|
||||
* `PUT`:更新数据。
|
||||
* `DELETE`:删除数据。
|
||||
|
||||
所以在 OpenAPI 里,每个 HTTP 方法都叫一个 “operation”。
|
||||
因此,在 OpenAPI 中,每一个 HTTP 方法都被称为「操作」。
|
||||
|
||||
我们下面也叫它们“操作”。
|
||||
我们也打算称呼它们为「操作」。
|
||||
|
||||
#### 定义路径操作装饰器 { #define-a-path-operation-decorator }
|
||||
#### 定义一个*路径操作装饰器* { #define-a-path-operation-decorator }
|
||||
|
||||
{* ../../docs_src/first_steps/tutorial001_py310.py hl[6] *}
|
||||
|
||||
`@app.get("/")` 告诉 **FastAPI**,下面这个函数负责处理去到:
|
||||
`@app.get("/")` 告诉 **FastAPI** 在它下方的函数负责处理如下访问请求:
|
||||
|
||||
* 路径 `/`
|
||||
* 使用一个 <dfn title="一个 HTTP GET 方法"><code>get</code> 操作</dfn>
|
||||
* 请求路径为 `/`
|
||||
* 使用 <dfn title="一种 HTTP GET 方法"><code>get</code> 操作</dfn>
|
||||
|
||||
/// note | `@decorator` 说明
|
||||
/// info | `@decorator` 信息
|
||||
|
||||
在 Python 里,`@something` 这种语法叫 “decorator”。
|
||||
`@something` 语法在 Python 中被称为「装饰器」。
|
||||
|
||||
你把它放在函数上面。像给函数戴了顶装饰用的帽子(大概名字就这么来的)。
|
||||
像一顶漂亮的装饰帽一样,将它放在一个函数的上方(我猜测这个术语的命名就是这么来的)。
|
||||
|
||||
“decorator” 会拿下面那个函数做点事。
|
||||
装饰器接收位于其下方的函数并且用它完成一些工作。
|
||||
|
||||
这里,这个装饰器告诉 **FastAPI**:下面的函数对应 **路径** `/`,**操作** 是 `get`。
|
||||
在我们的例子中,这个装饰器告诉 **FastAPI** 位于其下方的函数对应着**路径** `/` 加上 `get` **操作**。
|
||||
|
||||
它就是“路径操作装饰器”。
|
||||
它是一个「**路径操作装饰器**」。
|
||||
|
||||
///
|
||||
|
||||
你也可以用其他方法:
|
||||
你也可以使用其他的操作:
|
||||
|
||||
* `@app.post()`
|
||||
* `@app.put()`
|
||||
* `@app.delete()`
|
||||
|
||||
还有更少用的:
|
||||
以及更少见的:
|
||||
|
||||
* `@app.options()`
|
||||
* `@app.head()`
|
||||
* `@app.patch()`
|
||||
* `@app.trace()`
|
||||
|
||||
/// tip | 提示
|
||||
/// tip
|
||||
|
||||
这些方法怎么用由你决定。
|
||||
你可以随意使用任何一个操作(HTTP方法)。
|
||||
|
||||
**FastAPI** 不强制语义。
|
||||
**FastAPI** 没有强制要求操作有任何特定的含义。
|
||||
|
||||
这里说的是常见约定,不是硬性要求。
|
||||
此处提供的信息仅作为指导,而不是要求。
|
||||
|
||||
比如,用 GraphQL 时通常所有操作都用 `POST`。
|
||||
比如,当使用 GraphQL 时通常你所有的动作都通过 `POST` 一种方法执行。
|
||||
|
||||
///
|
||||
|
||||
### 步骤 4:定义路径操作函数 { #step-4-define-the-path-operation-function }
|
||||
### 步骤 4:定义**路径操作函数** { #step-4-define-the-path-operation-function }
|
||||
|
||||
这是我们的“路径操作函数”:
|
||||
这是我们的「**路径操作函数**」:
|
||||
|
||||
* 路径:`/`。
|
||||
* 操作:`get`。
|
||||
* 函数:装饰器下面那个函数(在 `@app.get("/")` 下面)。
|
||||
* **路径**:是 `/`。
|
||||
* **操作**:是 `get`。
|
||||
* **函数**:是位于「装饰器」下方的函数(位于 `@app.get("/")` 下方)。
|
||||
|
||||
{* ../../docs_src/first_steps/tutorial001_py310.py hl[7] *}
|
||||
|
||||
这是个 Python 函数。
|
||||
这是一个 Python 函数。
|
||||
|
||||
**FastAPI** 收到发到 “`/`” 的 `GET` 请求时就会调用它。
|
||||
每当 **FastAPI** 接收一个使用 `GET` 方法访问 URL「`/`」的请求时这个函数会被调用。
|
||||
|
||||
这里它是个 `async` 函数。
|
||||
在这个例子中,它是一个 `async` 函数。
|
||||
|
||||
---
|
||||
|
||||
你也可以不用 `async`,写成普通函数:
|
||||
你也可以将其定义为常规函数而不使用 `async def`:
|
||||
|
||||
{* ../../docs_src/first_steps/tutorial003_py310.py hl[7] *}
|
||||
|
||||
/// note | 注意
|
||||
/// note
|
||||
|
||||
不清楚区别?看 [Async: *"In a hurry?"*](../async.md#in-a-hurry)。
|
||||
如果你不知道两者的区别,请查阅 [并发: *赶时间吗?*](../async.md#in-a-hurry)。
|
||||
|
||||
///
|
||||
|
||||
@@ -399,37 +393,37 @@ https://example.com/items/foo
|
||||
|
||||
{* ../../docs_src/first_steps/tutorial001_py310.py hl[8] *}
|
||||
|
||||
可以返回 `dict`、`list`,或基础类型,比如 `str`、`int` 等。
|
||||
你可以返回一个 `dict`、`list`,像 `str`、`int` 一样的单个值,等等。
|
||||
|
||||
也可以返回 Pydantic 模型(后面会讲)。
|
||||
你还可以返回 Pydantic 模型(稍后你将了解更多)。
|
||||
|
||||
还有很多对象和模型会被自动转成 JSON(包括 ORMs 等)。用你喜欢的,基本都支持。
|
||||
还有许多其他将会自动转换为 JSON 的对象和模型(包括 ORM 对象等)。尝试下使用你最喜欢的一种,它很有可能已经被支持。
|
||||
|
||||
### 步骤 6:部署 { #step-6-deploy-it }
|
||||
|
||||
用一条命令把应用部署到 **[FastAPI Cloud](https://fastapicloud.com)**:`fastapi deploy`。🎉
|
||||
用一条命令将你的应用部署到 **[FastAPI Cloud](https://fastapicloud.com)**:`fastapi deploy`。🎉
|
||||
|
||||
#### 关于 FastAPI Cloud { #about-fastapi-cloud }
|
||||
|
||||
**[FastAPI Cloud](https://fastapicloud.com)** 出自 **FastAPI** 的作者和团队。
|
||||
**[FastAPI Cloud](https://fastapicloud.com)** 由 **FastAPI** 的作者和团队打造。
|
||||
|
||||
它让你几乎不费力地完成 API 的**构建**、**部署**和**访问**。
|
||||
它以最小的投入简化了 **构建**、**部署** 和 **访问** API 的流程。
|
||||
|
||||
把用 FastAPI 写应用的**开发体验**,带到**部署**到云上的过程里。🎉
|
||||
它把使用 FastAPI 构建应用的相同**开发者体验**带到了将应用**部署**到云端的过程。🎉
|
||||
|
||||
FastAPI Cloud 是 *FastAPI 及其好友* 开源项目的主要赞助方与资金提供者。✨
|
||||
FastAPI Cloud 是 *FastAPI 及其朋友们* 开源项目的主要赞助和资金提供方。✨
|
||||
|
||||
#### 部署到其他云厂商 { #deploy-to-other-cloud-providers }
|
||||
#### 部署到其他云服务商 { #deploy-to-other-cloud-providers }
|
||||
|
||||
FastAPI 是开源的,基于标准。你可以把 FastAPI 应用部署到任何云厂商。
|
||||
FastAPI 是开源并基于标准的。你可以将 FastAPI 应用部署到你选择的任何云服务商。
|
||||
|
||||
按你的云厂商的文档部署 FastAPI 即可。🤓
|
||||
按照你的云服务商的指南部署 FastAPI 应用即可。🤓
|
||||
|
||||
## 回顾 { #recap }
|
||||
## 总结 { #recap }
|
||||
|
||||
* 导入 `FastAPI`。
|
||||
* 创建一个 `app` 实例。
|
||||
* 写一个**路径操作装饰器**,比如 `@app.get("/")`。
|
||||
* 定义**路径操作函数**,比如 `def root(): ...`。
|
||||
* 用命令 `fastapi dev` 跑开发服务器。
|
||||
* 需要的话,用 `fastapi deploy` 部署。
|
||||
* 编写一个**路径操作装饰器**,如 `@app.get("/")`。
|
||||
* 定义一个**路径操作函数**,如 `def root(): ...`。
|
||||
* 使用命令 `fastapi dev` 运行开发服务器。
|
||||
* 可选:使用 `fastapi deploy` 部署你的应用。
|
||||
|
||||
@@ -4,57 +4,10 @@ Translate to Simplified Chinese (简体中文).
|
||||
|
||||
Language code: zh.
|
||||
|
||||
### Writing style
|
||||
|
||||
Write like a developer explaining something to a colleague over lunch — clear, direct, slightly casual. The reader is a Chinese-speaking programmer, not a professor or a manager.
|
||||
|
||||
**Core rules:**
|
||||
|
||||
1. One sentence, one idea. If a sentence has "并且" or "同时" connecting two independent thoughts, split it.
|
||||
2. Prefer short sentences (under 30 characters) over long ones.
|
||||
3. Use spoken Chinese word order, not English-influenced structure.
|
||||
4. Technical terms can stay in English if they're more commonly used that way (e.g. API, JSON, decorator, endpoint).
|
||||
5. Don't hedge. If something is true, say it. Don't write "可能" or "或许" unless the original text genuinely expresses uncertainty.
|
||||
|
||||
**Patterns to avoid (AI-style Chinese):**
|
||||
|
||||
| ❌ Don't write | ✅ Write instead | Why |
|
||||
|---|---|---|
|
||||
| 将其复制到...文件中 | 复制到...里 | "将其" is literary, not spoken |
|
||||
| 该行显示了...的URL地址 | 这行告诉你...的地址 | "该" as a pronoun is stiff; "地址" already implies URL |
|
||||
| 你将会看到 | 你会看到 | "将会" is news-anchor tone |
|
||||
| 它并非...而只是... | 不是...只是... | "并非...而只是" is essay-style; "不是...只是..." preserves the contrast |
|
||||
| 可能像下面这样 | 长这样 / 像这样 | "可能" is unnecessary hedging |
|
||||
| 由于路径首先匹配,因此始终会使用第一个定义的 | 路径优先匹配,永远走第一个 | Remove "由于...因此" scaffolding |
|
||||
| 通过从 str 继承,API 文档就能... | 继承 str 后,API 文档会... | "通过从...继承" is English grammar mapped to Chinese |
|
||||
| 能充分利用它的功能和优点 | 功能强还好用 | Don't inflate simple ideas |
|
||||
| 在使用 GET 时,...的交互式文档不会显示... | GET 请求不显示... | Remove filler ("在使用...时") |
|
||||
| 这并非偶然,整个框架都是围绕这种设计构建的 | 这不是巧合,整个框架就是这么设计的 | "围绕...构建" is a translation of "built around" |
|
||||
| 导入 Enum 并创建继承自...的子类 | 导入 Enum,写个继承...的子类 | "并创建" is formal; "写个" is natural |
|
||||
| 在路径操作函数内部直接访问模型对象的所有属性 | 在路径操作函数里直接访问模型的所有属性 | "内部" → "里"; "对象的" is redundant |
|
||||
|
||||
**More patterns to watch for:**
|
||||
|
||||
- ❌ "你可以在...中找到..." → ✅ "在...里" or just state it directly
|
||||
- ❌ "值得注意的是" → ✅ "注意" or just make the point
|
||||
- ❌ "在这种情况下" → ✅ "这时" or "这种时候"
|
||||
- ❌ "从...的角度来看" → ✅ Remove; just state the fact
|
||||
- ❌ "对于...而言" → ✅ Remove; restructure the sentence
|
||||
- ❌ "关于...的问题" → ✅ Remove; just name the topic
|
||||
- ❌ Redundant "你的" (your) — English needs "your API", Chinese often drops it when context is clear
|
||||
|
||||
**Reference style:**
|
||||
|
||||
Think of how these write technical Chinese:
|
||||
- Vue.js Chinese docs (vuejs.org/zh) — clean, direct, developer-friendly
|
||||
- 阮一峰's blog — conversational but precise
|
||||
- Go by Example Chinese (gobyexample-cn.github.io) — minimal, no fluff
|
||||
|
||||
### Grammar and tone
|
||||
|
||||
- Use "你" (not "您") to address the reader.
|
||||
- Keep the tone helpful but not condescending. Don't over-explain things that are obvious to a developer.
|
||||
- If the original English uses "you can..." or "you will see...", consider whether the Chinese version even needs the subject. Often you can drop "你" and just state the action.
|
||||
- Use clear, concise technical Chinese consistent with existing docs.
|
||||
- Address the reader naturally (commonly using “你/你的”).
|
||||
|
||||
### Headings
|
||||
|
||||
@@ -64,12 +17,12 @@ Think of how these write technical Chinese:
|
||||
|
||||
### Quotes and punctuation
|
||||
|
||||
- Keep punctuation style consistent with existing Simplified Chinese docs (they often mix English terms like "FastAPI" with Chinese text).
|
||||
- Keep punctuation style consistent with existing Simplified Chinese docs (they often mix English terms like “FastAPI” with Chinese text).
|
||||
- Never change punctuation inside inline code, code blocks, URLs, or file paths.
|
||||
|
||||
### Ellipsis
|
||||
|
||||
- Keep ellipsis style consistent within each document, prefer `...` over `……`.
|
||||
- Keep ellipsis style consistent within each document, prefer `...` over `……`.
|
||||
- Never change ellipsis in code, URLs, or CLI examples.
|
||||
|
||||
### Preferred translations / glossary
|
||||
@@ -80,28 +33,6 @@ Use the following preferred translations when they apply in documentation prose:
|
||||
- response (HTTP): 响应
|
||||
- path operation: 路径操作
|
||||
- path operation function: 路径操作函数
|
||||
- dependency injection: 依赖注入
|
||||
- middleware: 中间件
|
||||
- schema: 模式
|
||||
- validation: 校验
|
||||
- endpoint: 端点
|
||||
- decorator: 装饰器
|
||||
- parameter: 参数
|
||||
- argument: 参数(调用时传入的值)
|
||||
- return: 返回
|
||||
- raise: 抛出
|
||||
- import: 导入
|
||||
- module: 模块
|
||||
- package: 包
|
||||
- instance: 实例
|
||||
- attribute: 属性
|
||||
- method: 方法
|
||||
- function: 函数
|
||||
- class: 类
|
||||
- type: 类型
|
||||
- annotation: 标注
|
||||
- declare: 声明
|
||||
- async: 异步
|
||||
|
||||
### `///` admonitions
|
||||
|
||||
|
||||
Reference in New Issue
Block a user