mirror of
https://github.com/Lissy93/dashy.git
synced 2026-08-01 20:16:08 -04:00

408 lines
21 KiB
Markdown
408 lines
21 KiB
Markdown
# Authentik OIDC
|
|
|
|
Dashy supports using [Authentik](https://goauthentik.io/) as its OIDC provider.
|
|
|
|
[Authentik](https://goauthentik.io/) is an [open source](https://github.com/goauthentik/authentik) identity provider that speaks OIDC, OAuth 2.0, SAML 2.0 and LDAP. It runs in Docker, has a polished admin UI, and supports MFA, social login, and per-application group policies, which makes it a good fit for self-hosted setups where you want a single login across many services.
|
|
|
|
### Contents
|
|
|
|
- [1. Deploy Authentik](#1-deploy-authentik)
|
|
- [2. Configure Authentik](#2-configure-authentik)
|
|
- [Create the groups scope](#create-the-groups-scope)
|
|
- [Create the OIDC provider](#create-the-oidc-provider)
|
|
- [Create the application](#create-the-application)
|
|
- [Create the admin group](#create-the-admin-group)
|
|
- [Create test users](#create-test-users)
|
|
- [Restrict who can access Dashy (optional)](#restrict-who-can-access-dashy-optional)
|
|
- [3. Enabling Authentik in Dashy](#3-enabling-authentik-in-dashy)
|
|
- [4. Groups and Visibility](#4-groups-and-visibility)
|
|
- [5. Silent token renewal (optional)](#5-silent-token-renewal-optional)
|
|
- [Troubleshooting](#troubleshooting-common-authentik-issues)
|
|
- [Config Example](#config-example)
|
|
- [How it Works](#how-it-works)
|
|
|
|
## 1. Deploy Authentik
|
|
|
|
If you've not already done so, spin up an Authentik instance, following the [official docs](https://docs.goauthentik.io/docs/install-config/install/docker-compose). The compose file below is a minimal local setup.
|
|
|
|
A `.env` file alongside the compose file (generate fresh secrets with `openssl rand -hex 32`):
|
|
|
|
```env
|
|
AUTHENTIK_TAG=2024.12
|
|
PG_PASS=replace-me-with-random-hex
|
|
AUTHENTIK_SECRET_KEY=replace-me-with-random-hex
|
|
AUTHENTIK_BOOTSTRAP_PASSWORD=change-me-now
|
|
AUTHENTIK_BOOTSTRAP_EMAIL=you@example.com
|
|
AUTHENTIK_BOOTSTRAP_TOKEN=replace-me-with-random-hex
|
|
```
|
|
|
|
`AUTHENTIK_TAG` pins the Authentik version. `2024.12` is a tested baseline; any `2024.10`+ release works too (the Invalidation flow field below needs 2024.10 or newer).
|
|
|
|
<details>
|
|
<summary>Example <code>docker-compose.yml</code></summary>
|
|
|
|
```yaml
|
|
name: authentik
|
|
|
|
services:
|
|
postgresql:
|
|
image: docker.io/library/postgres:16-alpine
|
|
restart: unless-stopped
|
|
healthcheck:
|
|
test: ["CMD-SHELL", "pg_isready -d $${POSTGRES_DB} -U $${POSTGRES_USER}"]
|
|
start_period: 20s
|
|
interval: 10s
|
|
retries: 5
|
|
timeout: 5s
|
|
volumes:
|
|
- ./data/postgres:/var/lib/postgresql/data
|
|
environment:
|
|
POSTGRES_PASSWORD: ${PG_PASS}
|
|
POSTGRES_USER: authentik
|
|
POSTGRES_DB: authentik
|
|
|
|
redis:
|
|
image: docker.io/library/redis:7-alpine
|
|
command: --save 60 1 --loglevel warning
|
|
restart: unless-stopped
|
|
healthcheck:
|
|
test: ["CMD-SHELL", "redis-cli ping | grep PONG"]
|
|
start_period: 20s
|
|
interval: 10s
|
|
retries: 5
|
|
timeout: 3s
|
|
volumes:
|
|
- ./data/redis:/data
|
|
|
|
server:
|
|
image: ghcr.io/goauthentik/server:${AUTHENTIK_TAG}
|
|
restart: unless-stopped
|
|
command: server
|
|
environment: &authentik-env
|
|
AUTHENTIK_REDIS__HOST: redis
|
|
AUTHENTIK_POSTGRESQL__HOST: postgresql
|
|
AUTHENTIK_POSTGRESQL__USER: authentik
|
|
AUTHENTIK_POSTGRESQL__NAME: authentik
|
|
AUTHENTIK_POSTGRESQL__PASSWORD: ${PG_PASS}
|
|
AUTHENTIK_SECRET_KEY: ${AUTHENTIK_SECRET_KEY}
|
|
AUTHENTIK_BOOTSTRAP_PASSWORD: ${AUTHENTIK_BOOTSTRAP_PASSWORD}
|
|
AUTHENTIK_BOOTSTRAP_TOKEN: ${AUTHENTIK_BOOTSTRAP_TOKEN}
|
|
AUTHENTIK_BOOTSTRAP_EMAIL: ${AUTHENTIK_BOOTSTRAP_EMAIL}
|
|
AUTHENTIK_ERROR_REPORTING__ENABLED: "false"
|
|
ports:
|
|
- "9000:9000"
|
|
- "9443:9443"
|
|
depends_on:
|
|
postgresql: {condition: service_healthy}
|
|
redis: {condition: service_healthy}
|
|
|
|
worker:
|
|
image: ghcr.io/goauthentik/server:${AUTHENTIK_TAG}
|
|
restart: unless-stopped
|
|
command: worker
|
|
environment: *authentik-env
|
|
depends_on:
|
|
postgresql: {condition: service_healthy}
|
|
redis: {condition: service_healthy}
|
|
```
|
|
|
|
</details>
|
|
|
|
Bring it up:
|
|
|
|
```bash
|
|
docker compose up -d
|
|
```
|
|
|
|
First boot runs database migrations and takes a minute or two. Once the `server` container is healthy, open `http://localhost:9000` and sign in as `akadmin` with the bootstrap password.
|
|
|
|
---
|
|
|
|
## 2. Configure Authentik
|
|
|
|
### Create the groups scope
|
|
|
|
Authentik doesn't expose group membership in the id_token by default. Dashy needs it for the `adminGroup` check and for the `showForKeycloakUsers` / `hideForKeycloakUsers` visibility rules.
|
|
|
|
1. Go to **Customization > Property Mappings**
|
|
2. Click **Create > Scope Mapping**
|
|
3. Set **Name** to `groups`
|
|
4. Set **Scope name** to `groups`
|
|
5. Set **Expression** to:
|
|
|
|
```python
|
|
return {"groups": [g.name for g in request.user.ak_groups.all()]}
|
|
```
|
|
|
|
6. Click **Finish**
|
|
|
|
### Create the OIDC provider
|
|
|
|
1. Go to **Applications > Providers**
|
|
2. Click **Create**, pick **OAuth2/OpenID Provider**, click **Next**
|
|
3. Set **Name** to `Dashy`
|
|
4. Set **Authorization flow** to `default-provider-authorization-implicit-consent` (use `default-provider-authorization-explicit-consent` if you want users to confirm sign-in each time)
|
|
5. Set **Invalidation flow** to `default-provider-invalidation-flow` (required on Authentik 2024.10 and newer)
|
|
6. Under **Protocol settings**:
|
|
- **Client type**: `Public`
|
|
- **Client ID**: `dashy`, or leave the auto-generated value and copy it for later
|
|
- **Redirect URIs** with matching mode `Strict`, one URL per line. Register both the bare URL and the trailing-slash version:
|
|
- `https://dashy.example.com`
|
|
- `https://dashy.example.com/`
|
|
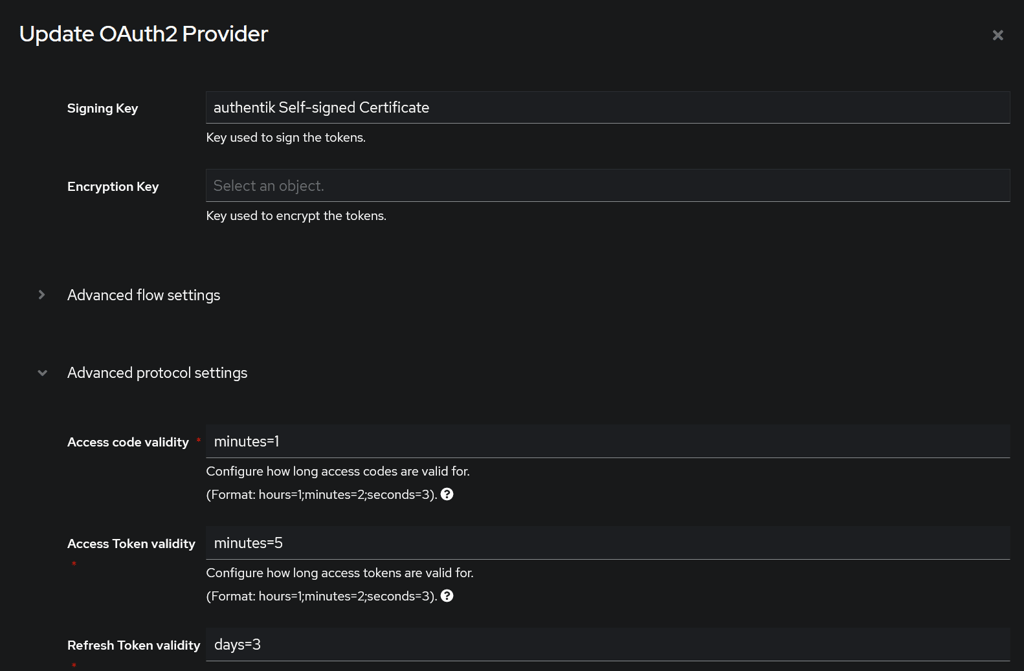
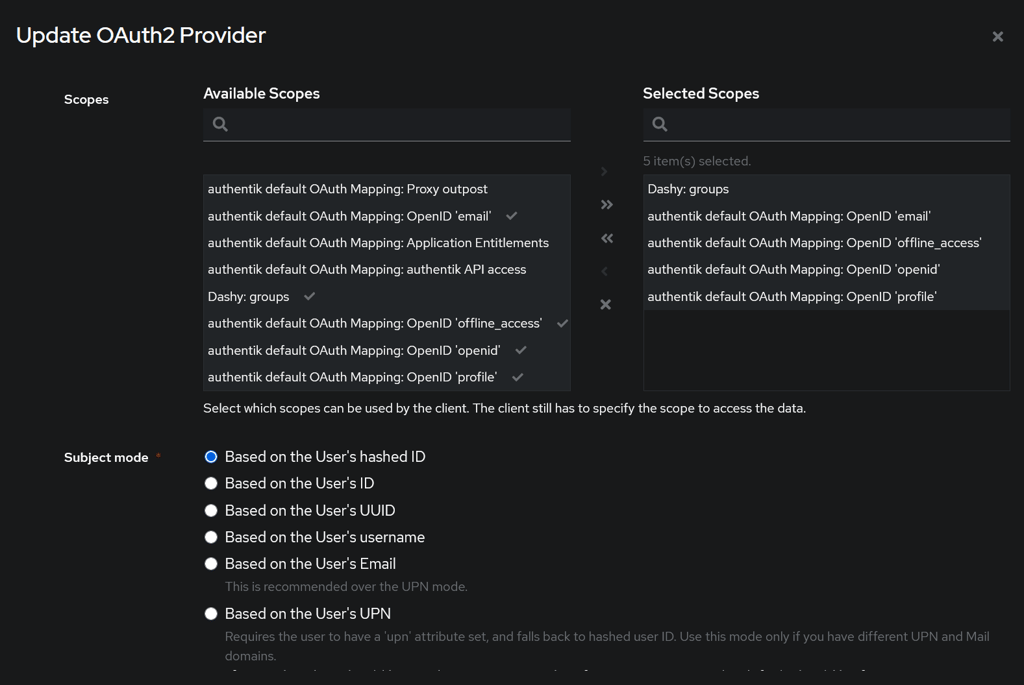
- **Signing Key**: the built-in `authentik Self-signed Certificate` is fine
|
|
7. Expand **Advanced protocol settings**:
|
|
- Add `openid`, `profile`, `email`, and the `groups` scope you just created to **Selected Scopes**
|
|
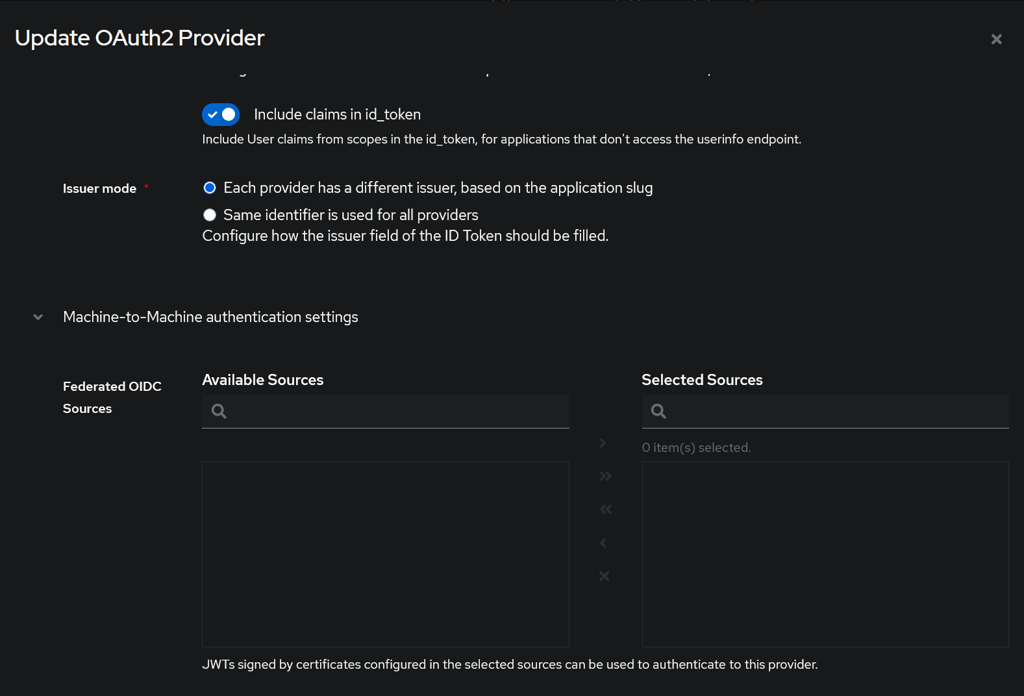
- Turn **Include claims in id_token** on
|
|
8. Click **Finish**
|
|
|
|
### Create the application
|
|
|
|
1. Go to **Applications > Applications**
|
|
2. Click **Create**
|
|
3. Set **Name** to `Dashy`
|
|
4. Set **Slug** to `dashy` (this becomes part of the issuer URL: `<host>/application/o/<slug>/`)
|
|
5. Set **Provider** to the `Dashy` provider you just made
|
|
6. Click **Create**
|
|
|
|
Now open the `Dashy` provider again (**Applications > Providers > Dashy**) and copy the **OpenID Configuration Issuer URL** shown on the page (e.g. `https://auth.example.com/application/o/dashy/`). The provider only displays a valid URL once it's bound to an application. You'll need this for Dashy's `endpoint` setting later.
|
|
|
|
### Create the admin group
|
|
|
|
1. Go to **Directory > Groups**
|
|
2. Click **Create**
|
|
3. Set **Name** to `dashy-admins`
|
|
4. Click **Create**
|
|
5. Open the new group, click **Users**, and add any users who should have admin rights in Dashy
|
|
|
|
### Create test users
|
|
|
|
If you want separate accounts beyond `akadmin`:
|
|
|
|
1. Go to **Directory > Users**
|
|
2. Click **Create**, fill in **Username**, **Name** and **Email**, click **Create**
|
|
3. On the new user's page, click **Set password**, set a password, click **Update**
|
|
4. Add the user to `dashy-admins` for admin access, or leave them out for a non-admin
|
|
|
|
### Restrict who can access Dashy (optional)
|
|
|
|
By default any Authentik user can sign in to Dashy. To limit access to one or more groups, bind a group policy to the `Dashy` application; Authentik then denies sign-in to anyone outside those groups. This is separate from `adminGroup`, which only controls who gets admin rights inside Dashy, not who can access it at all.
|
|
|
|
1. Go to **Applications > Applications** and open the `Dashy` application
|
|
|
|
<details>
|
|
<summary>screenshot</summary>
|
|
|
|

|
|
|
|
</details>
|
|
|
|
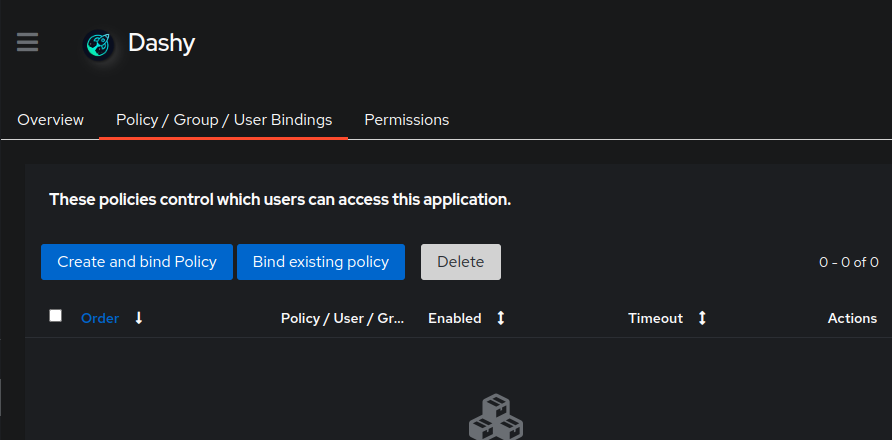
2. Open the **Policy / Group / User Bindings** tab and click **Bind existing policy**
|
|
|
|
<details>
|
|
<summary>screenshot</summary>
|
|
|
|
|
|
|
|
</details>
|
|
|
|
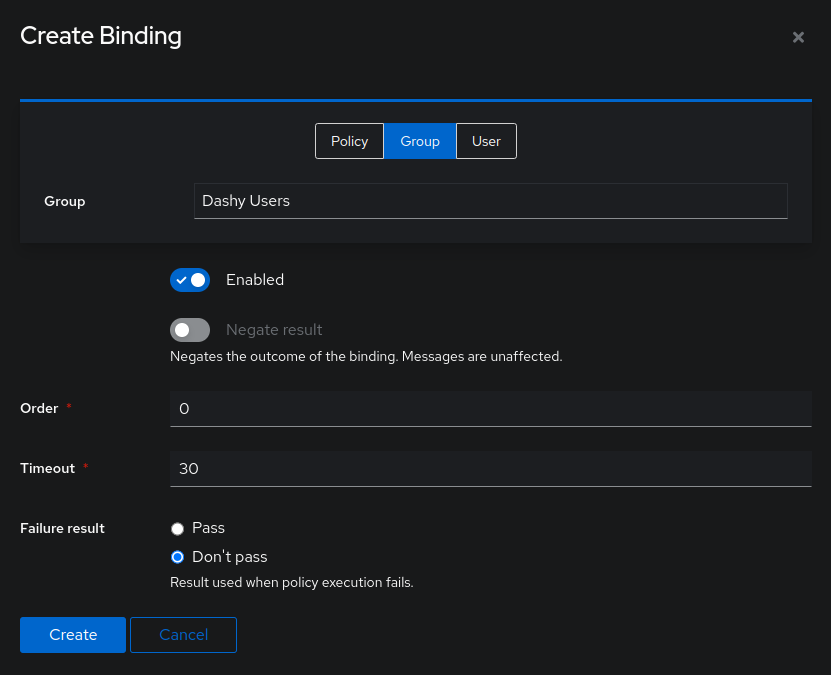
3. Switch to the **Group** tab, choose the group that should have access, make sure **Enabled** is on, and click **Create**
|
|
|
|
<details>
|
|
<summary>screenshot</summary>
|
|
|
|
|
|
|
|
</details>
|
|
|
|
Access is now limited to members of the bound group. Add another binding for each additional group that should be allowed in.
|
|
|
|
---
|
|
|
|
## 3. Enabling Authentik in Dashy
|
|
|
|
Finally, you need to tell Dashy to use Authentik. This goes in the `appConfig.auth` section of your main `/user-data/conf.yml`.
|
|
|
|
```yaml
|
|
appConfig:
|
|
...
|
|
disableConfigurationForNonAdmin: true
|
|
auth:
|
|
enableOidc: true
|
|
oidc:
|
|
clientId: dashy
|
|
endpoint: https://auth.example.com/application/o/dashy/
|
|
adminGroup: dashy-admins
|
|
scope: openid profile email groups
|
|
```
|
|
|
|
Where:
|
|
- `disableConfigurationForNonAdmin` - Prevent read/write config access to non-admin users
|
|
- `auth.enableOidc` - Set the auth mode to OIDC
|
|
- `clientId` - The Client ID from the Authentik provider (exact, case-sensitive)
|
|
- `endpoint` - The OpenID Configuration Issuer URL from the provider page. Use the bare issuer, not the discovery URL; Dashy appends `/.well-known/openid-configuration` itself
|
|
- `adminGroup` - Name of the Authentik group that grants admin in Dashy (matches the `dashy-admins` group above). To use roles instead, set `adminRole`, but Authentik has no `roles` claim by default, so groups are the simpler path here
|
|
- `scope` - Space-separated list of scopes to request. Must include `groups` when `adminGroup` is set, otherwise the id_token won't carry the claim
|
|
|
|
To let visitors view a read-only dashboard without signing in, add `enableGuestAccess: true` under `auth`; they skip the Authentik login, and admins still get edit access after signing in. See [guest access](./oidc.md#guest-access) for the details.
|
|
|
|
Restart Dashy for these changes to take effect.
|
|
|
|
If Authentik runs on a different host or behind a reverse proxy, make sure `endpoint` is reachable from inside the Dashy container, and that the issuer URL the provider advertises matches `endpoint` exactly.
|
|
|
|
Everything should now be fully configured and working 🎉
|
|
When you load Dashy, you'll be redirected to Authentik's login page. After signing in you will land back on Dashy's homepage with full access, and all of Dashy's client, server and asset endpoints will be locked behind authentication.
|
|
|
|
---
|
|
|
|
## 4. Groups and Visibility
|
|
|
|
Once group membership is in the id_token, you can use it to hide or show pages, sections and items in Dashy. The property name is `hideForKeycloakUsers` / `showForKeycloakUsers` (the name is historical; it works for any OIDC provider, including Authentik).
|
|
|
|
To make an Admin section visible only to members of `dashy-admins`:
|
|
|
|
```yaml
|
|
displayData:
|
|
showForKeycloakUsers:
|
|
groups:
|
|
- dashy-admins
|
|
```
|
|
|
|
Both `showForKeycloakUsers` and `hideForKeycloakUsers` accept lists of `groups` and `roles`. If a user matches an entry they're allowed or excluded as defined.
|
|
|
|
```yaml
|
|
sections:
|
|
- name: Internal Tools
|
|
displayData:
|
|
showForKeycloakUsers:
|
|
groups: ['dashy-admins']
|
|
hideForKeycloakUsers:
|
|
groups: ['guests']
|
|
items:
|
|
- title: Hidden from interns
|
|
displayData:
|
|
hideForKeycloakUsers:
|
|
groups: ['interns']
|
|
```
|
|
|
|
|
|
## 5. Silent token renewal (optional)
|
|
|
|
By default, when your token expires Dashy sends you back through Authentik's login to get a new one. Set `enableSilentRenew: true` to have Dashy refresh the session quietly in the background instead, using a refresh token:
|
|
|
|
```yaml
|
|
oidc:
|
|
clientId: dashy
|
|
endpoint: https://auth.example.com/application/o/dashy/
|
|
adminGroup: dashy-admins
|
|
scope: openid profile email groups
|
|
enableSilentRenew: true
|
|
```
|
|
|
|
Dashy adds the `offline_access` scope to its request automatically. Authentik ships an `offline_access` scope mapping by default, so just make sure it's listed under the provider's **Advanced protocol settings > Selected Scopes**. It's off by default, and if a refresh ever fails Dashy falls back to the normal sign-in. See [silent token renewal](./oidc.md#silent-token-renewal) for the full notes and caveats.
|
|
|
|
How often renewal fires is set by the provider's **Access Token validity** (and **Refresh Token validity**) under **Advanced protocol settings** in Authentik; the defaults suit most people.
|
|
|
|
---
|
|
|
|
## Troubleshooting common Authentik Issues
|
|
|
|
Two places will tell you what went wrong. Client-side problems, like a token Dashy can't use or a renewal that didn't take, are logged to the browser console tagged `SSO` or `OIDC`, so open your browser's DevTools and check the Console tab. Token verification failures show up in the Dashy server logs instead. Check whichever fits what you're seeing.
|
|
|
|
#### Migrations still running on first boot
|
|
Problem: Authentik returns 502 or never reaches the login page right after `docker compose up`.<br>
|
|
Solution: First boot runs database migrations and can take a minute or two. Tail the logs with `docker compose logs -f server` and wait for the `uvicorn` startup line before opening the UI.
|
|
|
|
#### Redirect loop after login
|
|
Problem: Browser bounces between Dashy and Authentik repeatedly.<br>
|
|
Solution: `endpoint` in `conf.yml` probably includes `.well-known/openid-configuration`. Drop everything from `.well-known` onwards; Dashy appends it itself.
|
|
|
|
#### invalid_redirect_uri
|
|
Problem: Authentik shows "invalid redirect URI" after submitting credentials.<br>
|
|
Solution: The URL Dashy is being served from doesn't exactly match what's registered on the provider. Register both the bare URL and the trailing-slash variant (e.g. `https://dashy.example.com` and `https://dashy.example.com/`), keep matching mode on `Strict`, and make sure the scheme matches (`http` vs `https`).
|
|
|
|
#### Logged in but config saves return 403
|
|
Problem: User authenticates fine, but saving the dashboard returns 403.<br>
|
|
Solution: The id_token isn't carrying the group claim. Paste the token (from localStorage, key `idToken`) into [jwt.io](https://jwt.io) and look for `groups`. If it's missing, the `groups` scope mapping isn't attached to the provider's **Selected Scopes** or **Include claims in id_token** is off. If the claim is there but the user isn't in it, add them to the `dashy-admins` group.
|
|
|
|
#### Issuer mismatch behind a reverse proxy
|
|
Problem: Server logs show `unexpected "iss" claim value`. The browser reaches Authentik over HTTPS, but Authentik advertises an HTTP issuer in its discovery document.<br>
|
|
Solution: Set `AUTHENTIK_LISTEN__TRUSTED_PROXY_CIDRS` on the Authentik server and worker containers to include your proxy's IP range (e.g. `172.16.0.0/12` for default Docker bridges), and make sure the proxy forwards `X-Forwarded-Proto: https`. Once Authentik trusts the proxy, its discovery document will advertise the public HTTPS URL.
|
|
|
|
#### Audience mismatch on token verification
|
|
Problem: Server logs show `unexpected "aud" claim value`. Every auth'd API call returns 401.<br>
|
|
Solution: `clientId` in `conf.yml` must exactly match the provider's **Client ID** field. If you let Authentik auto-generate one, copy the exact value (including case) from the provider page.
|
|
|
|
#### "SSO token is encrypted"
|
|
Problem: The browser console shows `SSO token is encrypted. Dashy needs signed JWT tokens, not encrypted JWE tokens.` and sign-in doesn't stick.<br>
|
|
Solution: The provider has an **Encryption Key** set, so Authentik hands Dashy an encrypted (JWE) token it can't read. Open the Dashy provider, expand **Advanced protocol settings**, clear the **Encryption Key** field so only the **Signing Key** stays set, and save. Dashy needs a signed token, not an encrypted one.
|
|
|
|
#### Self-signed Authentik certificate rejected
|
|
Problem: Fetching the discovery doc or JWKS fails and Dashy logs the generic `[auth-oidc] token verification failed: fetch failed`. Underneath that `fetch failed` is a TLS cert rejection (a self-signed or untrusted-CA cert on Authentik's HTTPS endpoint); the OpenSSL reason like `self-signed certificate` sits in the error cause, not the log line.<br>
|
|
Solution: Use a real certificate on the Authentik HTTPS endpoint (Let's Encrypt or your homelab CA), or mount your CA bundle into the Dashy container and set `NODE_EXTRA_CA_CERTS=/path/to/ca.pem`. Authentik's built-in `authentik Self-signed Certificate` is only used to sign tokens; the TLS cert is whatever's terminating HTTPS in front of Authentik.
|
|
|
|
#### "OIDC signinCallback returned no user"
|
|
Problem: Login submits, Authentik redirects back, then the browser console logs `OIDC signinCallback returned no user` and sign-in fails.<br>
|
|
Solution: The id_token came back without a usable username claim. Confirm `profile` and `email` are in the provider's **Selected Scopes**, that **Include claims in id_token** is on, and that the user has an email or username set in Authentik.
|
|
|
|
#### Logout stuck on a consent screen
|
|
Problem: Clicking Logout sends the user to Authentik's end-session endpoint, which prompts for confirmation and never returns.<br>
|
|
Solution: This is the default behaviour of `default-provider-invalidation-flow`. To skip the prompt, change the provider's **Invalidation flow** to one without a consent stage, or accept the extra click.
|
|
|
|
#### Token expired / clock skew
|
|
Problem: 401s with `"exp" claim timestamp check failed`, even just after login.<br>
|
|
Solution: Dashy allows 30 seconds of drift. Sync clocks on both hosts with NTP. Container clocks follow their host, so it's almost always the host that's drifted.
|
|
|
|
#### Silent renewal never refreshes the session
|
|
Problem: With `enableSilentRenew: true` the session still drops when the token expires, and the browser console mentions `ensure offline_access is granted`.<br>
|
|
Solution: Authentik isn't issuing a refresh token because the `offline_access` scope isn't granted. Open the Dashy provider, expand **Advanced protocol settings**, add the built-in `offline_access` scope to **Selected Scopes**, and save. Dashy requests `offline_access` on its own, so all Authentik has to do is allow it.
|
|
|
|
#### Numeric Client ID truncated
|
|
Problem: Audience mismatch when `clientId` in `conf.yml` is a long numeric string.<br>
|
|
Solution: Wrap numeric Client IDs in quotes (e.g. `clientId: "12345678901234567"`). Without quotes YAML parses the value as a JS number and loses precision past around 15 digits.
|
|
|
|
#### Dashy server can't reach Authentik
|
|
Problem: Auth'd API calls return 401 and Dashy logs show fetch errors for `.well-known/openid-configuration`.<br>
|
|
Solution: `endpoint` must be reachable from inside the Dashy container, not just from the browser. If both run in Docker, put them on the same network. Test with `docker exec <dashy-container> wget -qO- "$ENDPOINT/.well-known/openid-configuration"`.
|
|
|
|
#### Config change to auth.oidc not picked up
|
|
Problem: Updated `clientId`, `endpoint`, `adminGroup` or `scope` in `conf.yml`, but Dashy still uses the old values.<br>
|
|
Solution: The server reads the auth config only at boot. Restart the Dashy container after any change to fields under `auth.oidc`.
|
|
|
|
---
|
|
|
|
## Config Example
|
|
|
|
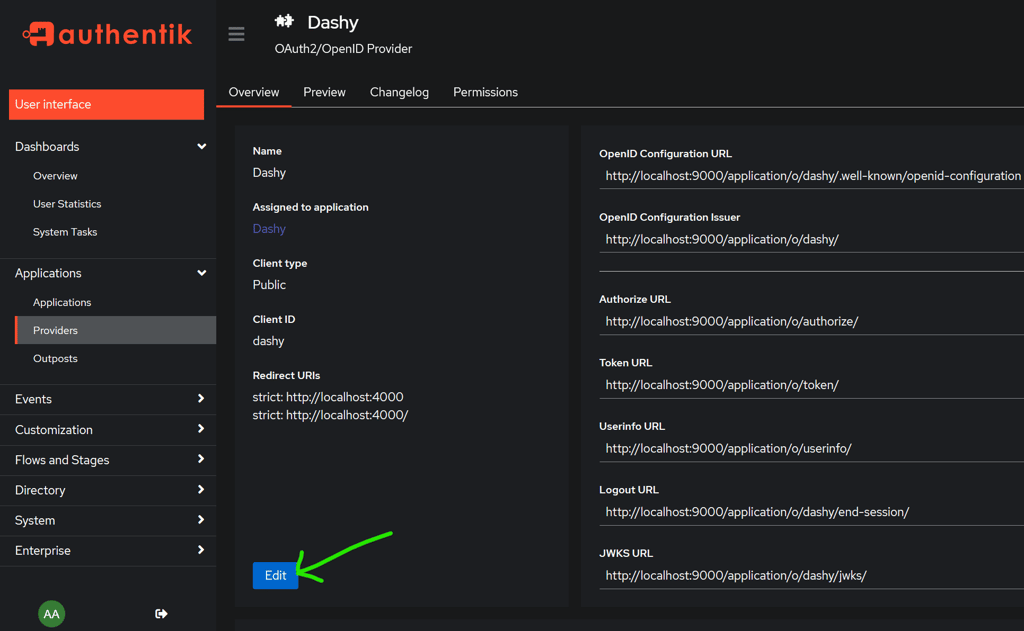
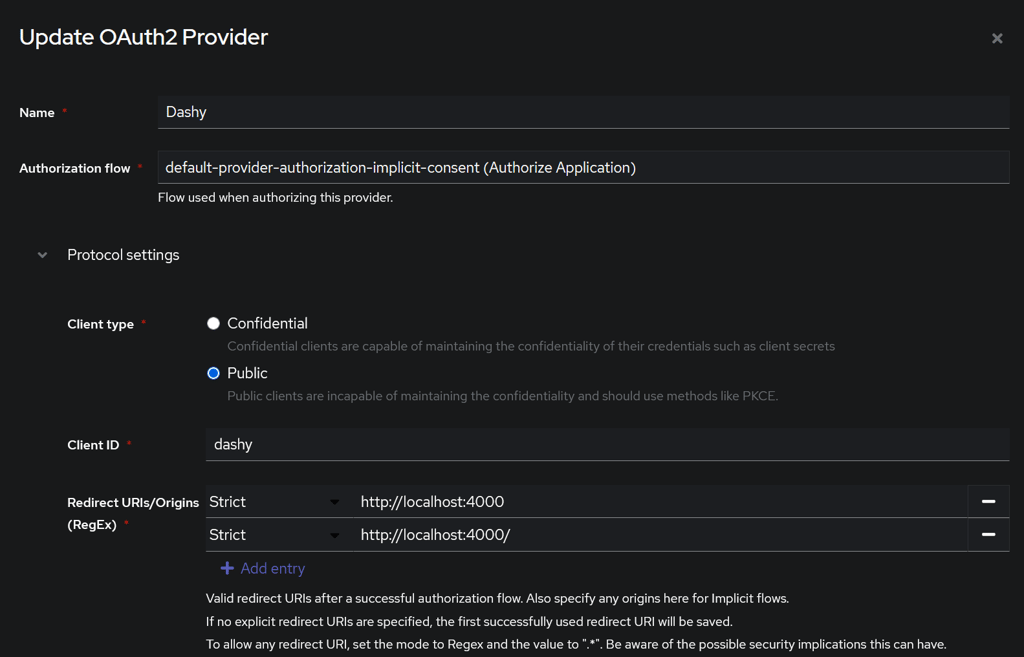
Below is an example of a configured local dashy instance (port 4000) for Authentik.
|
|
|
|
<details>
|
|
<summary>Screenshots of Dashy config in Authentik</summary>
|
|
|
|
|
|
|
|
|
|
|
|
|
|
|
|
</details>
|
|
|
|
---
|
|
|
|
## How it Works
|
|
|
|
Nothing here is specific to Authentik. Dashy speaks standard OIDC, so the same flow works with Keycloak or any other provider; only the config differs.
|
|
|
|
Here's what happens when you open Dashy with OIDC enabled:
|
|
|
|
1. Your browser asks the Dashy server for the config. You're not signed in yet, so the server only sends back the auth settings. Your sections, items and URLs stay on the server.
|
|
2. Dashy sees OIDC is enabled and redirects you to Authentik to sign in, using the standard authorization code flow with PKCE.
|
|
3. You enter your credentials (plus MFA if you've set it up). Authentik sends you back to Dashy with a one-time code, which the browser swaps for a signed token proving who you are and which groups you're in.
|
|
4. The browser stores that token and attaches it to every request it makes to the Dashy server.
|
|
5. The server checks each token against Authentik's published signing keys, and makes sure it was issued by your Authentik, for Dashy, and hasn't expired. A valid token gets the full config; no token or a bad one gets sent back to the login flow.
|
|
6. Your Authentik groups ride along inside the token. Being in the `adminGroup` lets you edit and save the config, and groups also power the show/hide visibility rules.
|
|
|
|
When the token expires you're bounced back through Authentik for a new one, which is usually instant since you still have a session there. With `enableSilentRenew` on, Dashy refreshes it in the background and you won't notice at all.
|
|
|
|
To sign out, use Dashy's Logout control: it clears the stored token and sends you to Authentik's end-session endpoint (see [Logout stuck on a consent screen](#logout-stuck-on-a-consent-screen) if that asks for confirmation).
|
|
|
|
If you want the implementation details, the client side lives in `src/utils/auth/OidcAuth.js` and the server-side token verification in `services/auth-oidc.js`.
|